Fastify is a new NodeJS upcoming framework and it's gaining quite some popularity. As its name implies, it is supposed to be fast and performance benchmarks do indicate that. You can start reading on that here.
Fastify is a modern framework that aims to provide better developer experience and it is based on a plugin ecosystem. A plugin is basically a custom NodeJS module, that you can use in your application (an there is a complex ecosystem of such plugins).
We will build a Youtube Converter using it. If you want to see the project live first, I have it deployed here.
Finally, create a server.js file in your project and paste the below code inside:
// Require the framework and instantiate it
const fastify = require("fastify")({
  logger: true,
});

// Declare a route
fastify.get("/", async (request, reply) => {
  return { message: "welcome to my fastify App" };
});

// Run the server!
const start = async () => {
  try {
    await fastify.listen({ port: 3000 });
  } catch (err) {
    fastify.log.error(err);
    process.exit(1);
  }
};
start();
Run npm run dev and check your application in the browser, by going to http://localhost:3000.
So far our server.js imports fastify and initialises it, declares a route and runs the server (the fastify instance). A very interesting point for me when I first used this framework was the fact that it logs a bunch of details on every request. However, the output of the log is a bit messy, I can barely figure out what it does. Note that for now, we are only passing an object like: { logger: true } to the fastify instance. Let's modify that a bit. Start by installing pino-pretty.
npm i pino-pretty
Next, paste the below "logging configuration" in server.js above everything else:
Pino-pretty is a library that will make our logs prettier and clearer.
Once installation finished, start the server again with npm run dev and you will have much better logs with much clearer contents. Note how they are indented better and we see each request logged individually. I don't know for you but for me, having very clear logs is extremely important during work on any project.
In order to build our Youtube Converter we will need fastify to serve static files. We use a plugin for this. We have to install it and register it. Fastify uses heavily this plugin ecosystem so let's install one by running:
Now, if you go to http://localhost:3000 you get to see our bootstrap5 form displayed. Bootstrap is a very powerful CSS framework, which is perfect for quick prototypes such as this little application that we are building. You can read more about it here.
Before moving on, we need to add some more custom JavaScript to our script. I want the form to be validated and to submit some input to our back-end. We will not use the default bootstrap validation as it works on submit, whereas I want our application to 'validate' our form while the user types (so for instance, if they type a bad url, the form should become invalid even before attempting to hit the 'Convert' button). Therefore, in the index.html file in the last <script> tag, just add the below custom code:
We have added a bunch of methods, but I will discuss only 3 of them. submitData() submits the data using the axios library. It makes an http request from the client with the user input data (if it passes the validation) so if they paste in a good url and choose a format.
The triggerDownload() method shows the download button and sets some attributes onto it (such as disabled if the video is too long or id so that we know which song we want to download).
Finally the downloadSong() method opens a new tab and sends 2 parameters (the video/song id as a url parameter and the extension as a query string parameter so that we can download a specific song and a specific format). Note that we want our users to choose if they want to download an mp3 audio song or a full mp4 video.
Now we are pretty much done with the front, it's time to move to the back-end.
Let's start by installing ytdl-core so run the below command:
npm i ytdl-core
Import ytdl-core and fs up top in the server.js file:
This method reads the url from the request.body (note that just as Express, fastify also uses a request and a response object, which it calls reply), it checks the length of the video (we have set a limit of 7200 seconds so of 2 hrs) and if length is good it writes a stream with the video to the downloads directory. On the finish event, it sends the response to the client (a payload which we use to display the download button in our app and set up the extension and file id in the url on the front).
Create a /templates/downloads directory (remember that we registered as 'root' for fastify-static the 'templates' directory). That's where we will be saving our downloaded songs/videos.
Now, we can set up a route for the /audio format. Add it in the server.js file:
Now, if you paste a youtube link in the interface, choose the 'audio' file in the dropdown and hit convert, you will see that the song is actually saved as an mp3 file in the /templates/downloads directory on the server.
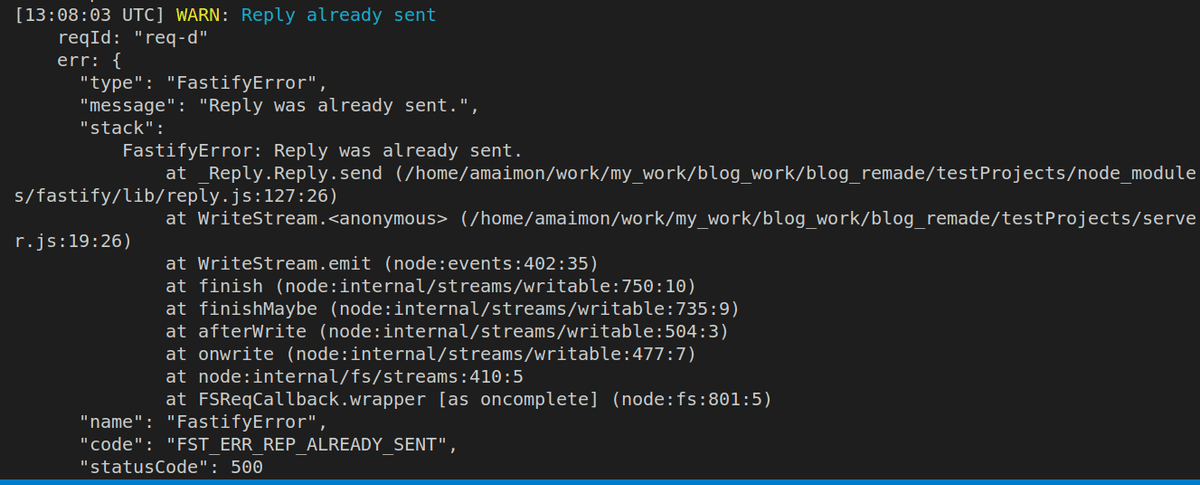
All looks good except for the fact that fastify throws an exception with 'reply already sent'. I've had this warning a few times before and it was quite annoying until I figured out how to deal with it. The warning looks like this:
We need to "promisify" our function which is currently using a callback style. Fastiy thinks these callbacks are unpredictable and throws warnings or errors for them. We are waiting for the 'finish' event to finish. We could move the reply.send() call outside the 'finish' callback but that would mean that if our downloading takes longer, we generate the download button on the client, without actually having finished downloading the content on the server. In order to fix this in a more elegant way, we need to use a little utility function called promisify that wraps the callback-style function in a promise. Import it up top in the server.js:
const { promisify } = require("util");
Next, wrap the downloadContentAndSendLink() method in promisify() like so:
Once that done, add the below block of code that will automatically create the downloads directory if it does not exist. Add it right under the const fastify = ... line:
//create downloads dir if it does not exist
const downloadsDir = "./templates/downloads";
if (!existsSync(downloadsDir)) {
  mkdirSync(downloadsDir);
}
Finally we can set up the /download route so we'll be able to actually 'download' our youtube song from the client too (so far ) we have been downloading it only on the server. Paste the route in server.js:
Now, if we click on the Download button in the client interface, we get the song downloaded from our server. This all seems to be working well, let's add the /video route too, so we can download in mp4 format too. Paste it in the server.js:
Try submitting the same link, but this time choose the video format in the interface. Next, once a new download button has been generated, click it and download your video. Try testing with more videos, even longer ones (try even with a more than 2 hr video, to see how everything works and how you get a 'video too long' response).
Our application is pretty much done, I want to do only 2 more things. First, I want the songs/videos to be deleted from the server say 1 minute after their first client download. We don't want our server to get overcrowded with data so that our app will crash. Furthermore, I also want to set up a cron job that will completely delete all the stuff in the downloads directory once a day, so that if someone just sends links to our server and downloads stuff in there, without actually downloading it on the client and triggering our custom delete logic, the videos/songs are still deleted automatically every 24 hrs.
Let's start with the bit of logic that deletes every video/song from our server 1 minute after it has been downloaded from the client. In order to do that, we just have to add the following bit of code in the /download route:
//delete downloaded file after 1 min
setTimeout(async () => {
  const dir = "./templates/downloads";
  readdirSync(dir).forEach((f) =>
    f === `${id}.${extension}` ? unlinkSync(`${dir}/${f}`) : null
  );
}, 60000);
*add the above code in the /download route, right above the return reply.download() line.
Next, if you try downloading your song again, from the client, it will get deleted in 1 min.
Now, we only need to set up the cron job that will delete everything in the /downloads directory once a day. We need to install another plugin called fastify-cron. Run the below command:
npm i fastify-cron
Once that's done, import it up top in the server.js file:
const fastifyCron = require("fastify-cron");
Next, we need to configure it. Paste this block in the server.js file, right above the block that creates the downloads directory:
//set up cron
fastify.register(fastifyCron, {
  jobs: [
    {
      // Only these two properties are required,
      // the rest is from the node-cron API:
      // https://github.com/kelektiv/node-cron#api
      cronTime: "0 0 * * *", // Everyday at midnight UTC

      // Note: the callbacks (onTick & onComplete) take the server
      // as an argument, as opposed to nothing in the node-cron API:
      onTick: async () => {
        const dir = "./templates/downloads";
        readdirSync(dir).forEach((f) => unlinkSync(`${dir}/${f}`));
      },
    },
  ],
});
Finally, at the bottom of server.js replace the line await fastify.listen({ port: 3000 }); with:
If you want to test the cron job a bit, you can modify the time for it based on your local time on the machine (or you can put simply "* * * * *") to trigger it.
We have now finished implementing our functionalities and even set up a cron tab to clean up our server downloads. If you want to check out the code for this project, you can do so by checking this GitHub repo.
Thanks for sticking with me so far, and I really hope you've enjoyed this project.