It's finally time for us to dig into some more advanced front-end frameworks such as React.
As you may or may not know, React is one of the most popular front-end libraries nowadays and during a web development project or at a job, you have all chances of bumping into it. It is very poweful and versatile a tool and we will have an introductory look at it in this article.
Furthermore, we will also have a look at the topic of Software Testing which basically means writing some code that tests your initial code and makes sure everything works properly and doesn't break. There are multiple types of testing (e.g. unit, integration, end to end, behavioural.. read upon them if you'd like to know more).
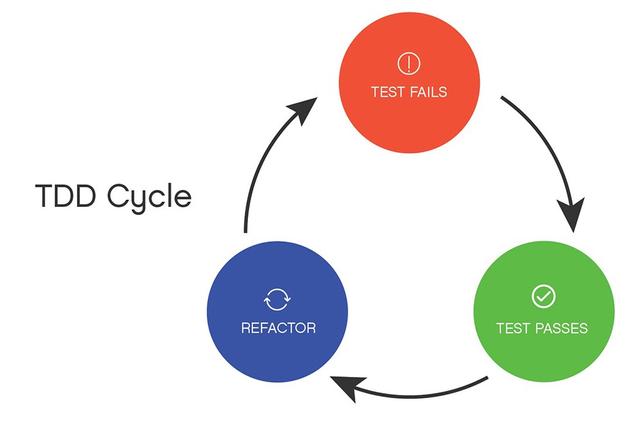
For our purpose in this article, we will write a simple React Application in TDD (test driven development) fashion.
TDD is a practice I like a lot. I think the code created through this practice is more robust and less prone to errors. What does TDD mean? It simply means that we write first some test cases for our code (structured as software tests) we run them, they fail (as we have no full implementation) and then, based on the failing tests, we actually implement our code and the tests eventually pass.
But enough with this idle chit chat, let's get down to business. We will fist be generating a react application. cd into a directory where you'd like your project to live and run the below command:
npx create-react-app pomodoro_tdd
Once the command finishes executing, your react boiler plate application is set. Open it in your favourite text editor and let's start working on our project.
Before we actually write some code, we need to understand the structure of this boiler plate app. As you noticed, you will have there a package.json file (listing all of your dependencies and tooling for the project), a package.lock.json (keeping track of the versions of all the stuff in package.json), a public directory (which holds static assets like icons/images and an index.html file which is served to the client),and an src directory (where you'll find a bunch of files that hold the core of your application logic such as App.js and index.js).
Let's also clean up the project a bit so that we can start working on it. From the src directory delete the following files: index.css, logo.svg and reportWebVitals.js. Next, paste the below code in App.js:
Finally, from the index.js file (in 'src') delete all references to the index.css and reportWebVitals.js files which you just deleted.
Next, create a tests directory (inside the src) and move the App.test.js file inside of it. Then, change the name of App.test.js to App.spec.js and paste the below code inside of it:
This will enable us to style the application easier.
Now, you are all set up and we can start writing the application. For starters in a terminal run the below command:
yarn test
*you should also delete the package.lock.json file as yarn will create a yarn.lock file to keep track of dependency versions and it is a more reliable package manager than npm.
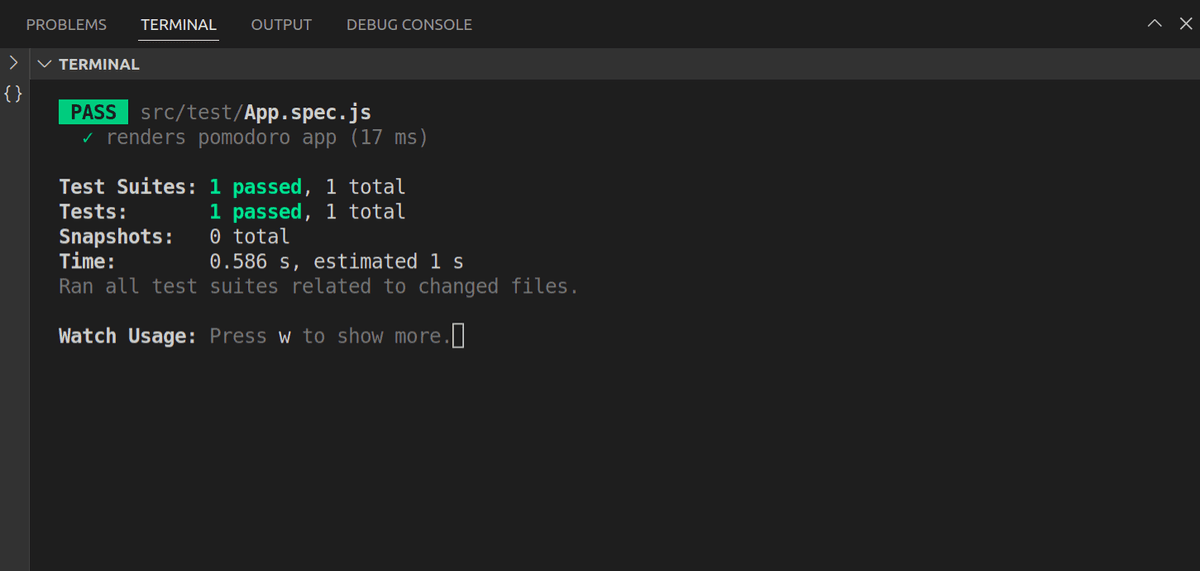
Once the command ran, you will see the below output in the console:
This test basically 'tests' that we are rendering a basic string inside a div.
Our basic test uses react-testing-library which is an official testing library provided by react. It is very useful for testing and it encourages the developers to test 'functionally' of the software (so not the internal implementation but the actual behaviour of our app). This is a counterpart to some other testing library like Enzyme which encourages developers to test the internal implementation of the code.
I personally agree that testing the code behaviour is more important than the actual implementation (so if for instance my function is called from some class or through some anonymous arrow function, my test should not break if the behaviour of the code does not chage).
expect is a function we use to test a value and toBeInTheDocument is a matcher (a function that allows us to test a value in a certain way).
We are accessing it throug the jest-dom dependency which is listed in our project and comes by default with react. So inside our tests we are using a virtual DOM (provided to us by react-testing-library and jest-dom) so that we can render() components without actually firing up the application.
Let's start by adding some more tests to App.spec.js. Replace the contents of the file with the below code:
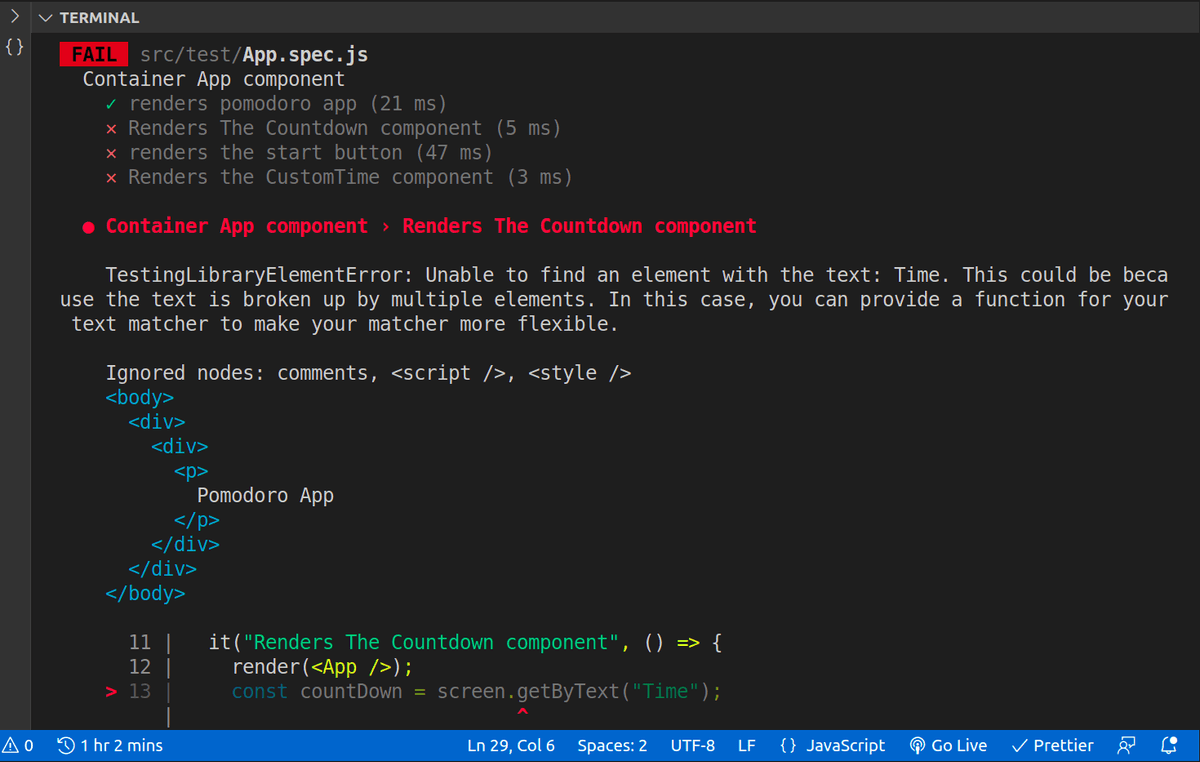
You should notice that if you left the first yarn test command running, it was re-executed automatically (as jest watches our files and runs the tests again whenever we change something). Furthermore, our newly added 3 tests fail for obvious reasons (we do not have the components we are trying to check on in our application). In the terminal you should see some log like this showing what is failing and why:
*if you scroll down on this log, you can also see the output of the rendered DOM (which is very helpful in debugging stuff when tests fail for unknown reasons).
The first test failed is the one checking on the Countdown component. Let's create a /components directory (inside src and a Countdown.js file inside of it).
This is a functional component that simply renders the time we have available and uses the displayTimeVals() function to convert that time from miliseconds into minutes and seconds. If you want to read more about functional vs class based components in react, you can do so, but in this article we will use functional components.
Now that we've added our component, we need to import and use it inside of App.js or our test will still fail. First, import the component in App.js by adding this line:
import { Countdown } from "./components/Countdown";
Next, import the useState() hook up top in the App.js file:
import { useState } from "react";
React hooks are a new addition to React (they have been added starting with version 16.8) and are basically functions that allow us to manipulate the lifecycle of a component a bit better than traditional lifecycle methods from class based components. The React components work like basic web components (with some tweaks and optimisations) and we need to uniformly update state inside of them and we can do that through these lifecycle hooks (they are called 'hooks' because they allow us to 'hook' into lifecycle inside a functional component - which initially was 'dumb' - had no state and would only receive props).
Note how the useState() hook basically destructures the 'piece of state' that we define into a variable and a setter for it while also setting a 'default value' for the variable. So we have declared a 'time' and a 'tempTime' variable. Next, render the Countdown component like so, inside the App.js file. Paste this right under the <p> element with the pomodoro text:
<Countdown time={time > 0 ? time : tempTime} />
If you looked carefully at the Countdown.js file that we created, you've noticed that it gets a time prop (which is the time value it's supposed to display, in milliseconds). In the App.js file we pass as that 'time' prop our own 'time' variable only if that is higher than 0, else we pass it the 'tempTime' variable. You will see later on why we are using 2 pieces of state for this.
Also, congratulations! One of the first 3 tests we have added is now passing (since we did add the Countdown component) in our application.
What you have seen here is a case of red/green testing (aslo know as red-green-refactor) which means we first write some tests (that fail) next we implement the code so that our tests don't fail anymore, and eventually we refactor/further optimise the code.
No code is perfect but code written in TDD fashion, is definitely more robust than code that has not tests at all or that has tests only added as an extra choir after the actual development process. You should also know that the older an application (so the later you add your tests), the harder it gets to actually add them, and the less relevant the tests are (as they will only try to work around the existing code and shomehow test it).
Now let's quickly add the button component so that our second test passes. Inside the /components directory create a BaseButton.js file and paste the below code inside of it:
This is another functional component that receives 3 props: a text for the button (so the caption), a handler function (executed upon button click) and an extra class which we can use to apply additional styles to the button if we need so.
Next, import the BaseButton component inside App.js and render it under the Countdown component :
<BaseButton btnText="start" />
Now, the second test passes (we have the button).
Next, we need to add the CustomTime component. Create the file inside 'components' and paste the below inside:
Now all our tests are passing. This is a small step, but by now, you've got an idea about how TDD works.
Let's add another test case in our App.spec.js file:
it("Allows the user to start and stop the timer", async () => {
  render(<App />);
  const startBtn = screen.getByText("start");
  screen.getByText("00: 02");
  fireEvent.click(startBtn);
  const stopBtn = screen.getByText("stop");
  await new Promise((r) => setTimeout(r, 1000));
  fireEvent.click(stopBtn);
  screen.getByText("00: 01");
});
First of all, our test will fail because it does not know what fireEvent is, so just add it in the import along screen and render.
Now the test is 'legitimately' failing because we have no 'stop' button. We need to implement the 'timer' functionality and that's what this test is for.
We need to add a few more lines to App.js. First, add the useRef and useEffect hooks in the useState import up top. Next, add the below line under the 'tempTime' variable definition:
const intervalId = useRef();
Here we 'use' the useRef hook so that our App component can trace the time through its lifecycle and update it accordingly.
The useEffect hook lets us perform 'side effects' inside of our components (so update the state uniformly through the component's lifecycle without breaking that lifecycle).
Under the useRef hook usage, add the below variable:
This block of code will continuously 'watch' the time variable and whenever it reaches 0, it will reset the timer. Otherwise the timer would still run below 0, which is not what we want.
Below this useEffect() block paste the below startTimer() method:
The startTimer() method will start the timer and make the time decrease by 1000 miliseconds each second.
The stopTimer() method sets the current time variable into a temporary time and sets the actual time variable to 0 so that the timer is stopped for good.
Next replace the current BaseButton component with the below block:
Also, add the below class on the parent div in the App.js file: className="container p-5 bg-primary card" and add the className="text-light text-center h1" on the pomodoro paragraph.
Now, the test that 'tests' the user can start/stop the timer should pass. You can also fire upp the app and test it at this point.
Let's add one more test now, making sure that when the timer reaches the value 0, it is reset to a certain value. Paste the below test in the App.spec.js file:
it("When time reaches 0 it sets the timer to 10 minutes", async () => {
  render(<App />);
  const startBtn = screen.getByText("start");
  screen.getByText("00: 02");
  fireEvent.click(startBtn);
  const checkStartBtn = () => screen.getByText("stop");
  await new Promise((r) => setTimeout(r, 3000));
  screen.getByText("10: 00");
  screen.getByRole("button", { name: "start" });
  expect(checkStartBtn).toThrow(); //this is gone now that timer stopped automatically
});
This will obviously fail. In order for it to pass, paste the below code in App.js above the return statement:
//stop timer if time ran out
useEffect(() => {
  if (time === 0 && tempTime === 0) {
    //default 10 mins
    setTime(0);
    setRunningTime(false);
    setTime(600000);
  }
}, [tempTime, time]);
Now the test passes. Let's start working on the CustomTime component. We need the component to allow the user to set an arbitrary value for the time. Let's create a CustomTime.spec.js file inside the tests directory.
Paste the below test-suite inside of it:
import { render, screen, fireEvent } from "@testing-library/react";
import { CustomTime } from "../components/CustomTime";
import App from "../App";

describe("CustomTime component", () => {
  it("Renders the CustomTime component", () => {
    render(<CustomTime />);
    const customTimeComponent = screen.getByText("Choose your own interval");
    expect(customTimeComponent).toBeTruthy();
  });

  it("Allows the user to set a certain time in minutes by tyiping in the placeholder and clicking the button", () => {
    render(<App />);
    const timeVal = screen.getByText("00: 02");
    expect(timeVal).toHaveTextContent("00: 02");
    const customTimeComponent = screen.getByPlaceholderText("Enter minutes");
    fireEvent.change(customTimeComponent, { target: { value: "3" } });
    const btnComponent = screen.getByText("Set Minutes");
    fireEvent.click(btnComponent, {});
    const timeVal2 = screen.getByText("03: 00");
    expect(timeVal2).toHaveTextContent("03: 00");
  });
});
Run the test file and see it fail (at least the 2nd test from the suite). In order to fix it, we need to implement the respective functionality.
A final feature I would like to implement in our application is a little progress bar. So that when the time runs, we can see it visually defined in the interface. As usual, let's first add 2 tests for that. Paste them in the App.spec.js file for now:
it("Does not render  the ProgressBar component if the time is not started", () => {
  render(<App />);
  const progressBar = () => screen.getByRole("progressbar");
  expect(progressBar).toThrow();
});

it("Renders the progress bar if the time is started", () => {
  render(<App />);
  const startBtn = screen.getByText("start");
  fireEvent.click(startBtn);
  const progressBar = screen.getByRole("progressbar");
  expect(progressBar).toBeTruthy();
});
The first test will pass (as we have no progressbar component, there's nothing rendered) but the second one fails for obvious reasons. Let's code the ProgressBar.js file. Add it in the 'components' directory and paste the below inside:
We are passing 3 props to this new component, we already have time and tempTime, the only missing one is percentageSplit. Add it by pasting the below line under the other pieces of state:
Finally, in the useEffect() call that sets the time to 10 minutes once time ran out, paste 1 more line:
setPercentageSplit(600000 / 100);
Next, import the ProgressBar component in App.js and use it.
Make sure you add it in the { isTimeRunning && ()} block. Also, since except for the stop button, you will now render another element in there, make sure you wrap everything in a react fragment like so: <> </>. So replace the {isTimeRunning &&} block with:
Now the test should pass. Before wrapping this up, I would like for us to write 2 more test files for the BaseButton.js and 1 more for the Countdown.js. We already have tests for them in the App.js but I just want some dedicated test files too. Let's start with the BaseButton, create a BaseButton.spec.js and paste the below inside:
Create a Countdown.spec.js file too and paste the below inside:
import { render, screen } from "@testing-library/react";
import { Countdown, displayTimeVals } from "../components/Countdown";

describe("Countdown component", () => {
  it("Renders the Countdown component", () => {
    render(<Countdown />);
    const countdownComponent = screen.getByText("Time");
    expect(countdownComponent).toBeTruthy();
  });

  it("Has a value of 0 seconds configured by default", () => {
    render(<Countdown />);
    const timeVal = screen.getByText("00: 00");
    expect(timeVal).toHaveTextContent("00: 00");
  });

  it("Allows the user to configure a certain time value", () => {
    render(<Countdown time={2000} />);
    const timeVal = screen.getByText("00: 02");
    expect(timeVal).toHaveTextContent("00: 02");
  });

  it("Displays time values in minutes and seconds and receives miliseconds as props", () => {
    const timeVal = displayTimeVals(2000);
    expect(timeVal).toBe("00: 02");
  });

  it("Displays time value 0 if no miliseconds argument is passed in", () => {
    const timeVal = displayTimeVals();
    expect(timeVal).toBe("00: 00");
  });
});
We will not be adding a test file for the ProgressBar component as we have pretty much covered its testing inside of App.js. For a better structure in the case of this app you could move the testcases for the progress bar in their own dedicated test file but I won't be doing that now.
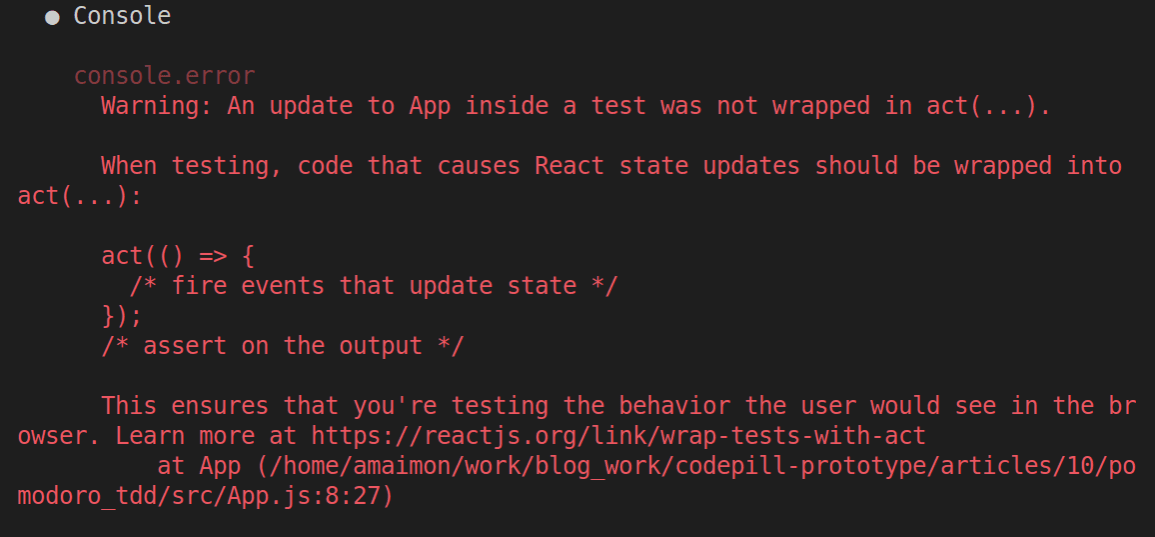
I've noticed when running all the tests again, that we have made a little mistake when implementing the test cases in which we have to wait a number of seconds before firing events. Currently our implementation uses something like: await new Promise((r) => setTimeout(r, 1000)); which throws the below warning:
This warning means that we have to wrap the await new Promise(...) bits in act(() => {}) . So import it in the App.spec.js file:
import { act } from "react-dom/test-utils";
Next, in the 2 test cases where we wait for 1 and 3 seconds, wrap the calls in act as per below example:
//replace  await new Promise((r) => setTimeout(r, 1000)); with below
await act(async () => {
  await new Promise((r) => setTimeout(r, 1000));
});
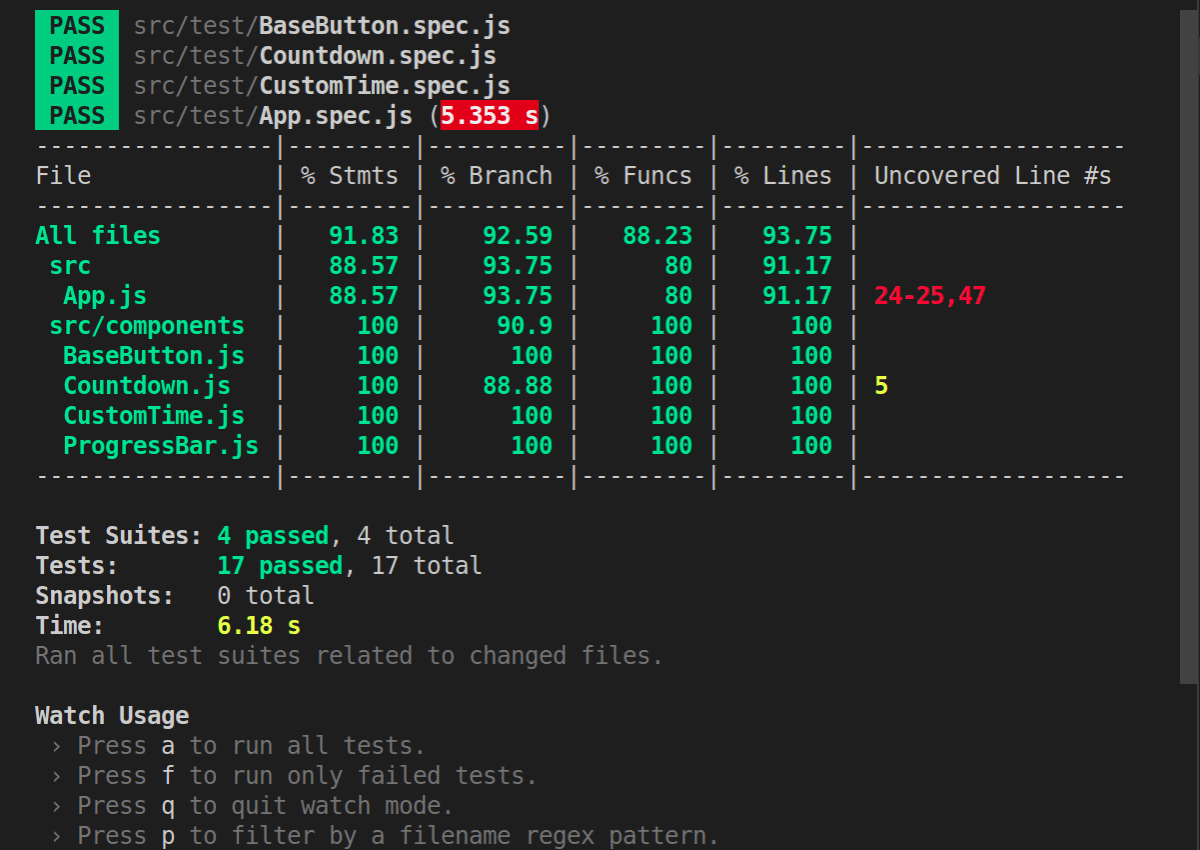
Before wrapping everything up, I will show you one more trick. If instead of yarn test you run yarn test -- --coverage, you will see some output like below:
If by some change, the output shows you 0 percentage for all the files, just run the command as: yarn test -- --coverage --watchAll=false.
This is the coverage for our test files. Besides this nice output we have here, it also generated a /coverage directory in our project which shows more in-depth the coverage. If we look at the terminal output only, we can see that for instance in my case, the App.js file is tested only in a proportion of 88.57% which is good. It also shows me which lines are not tested (24-25 and 47).
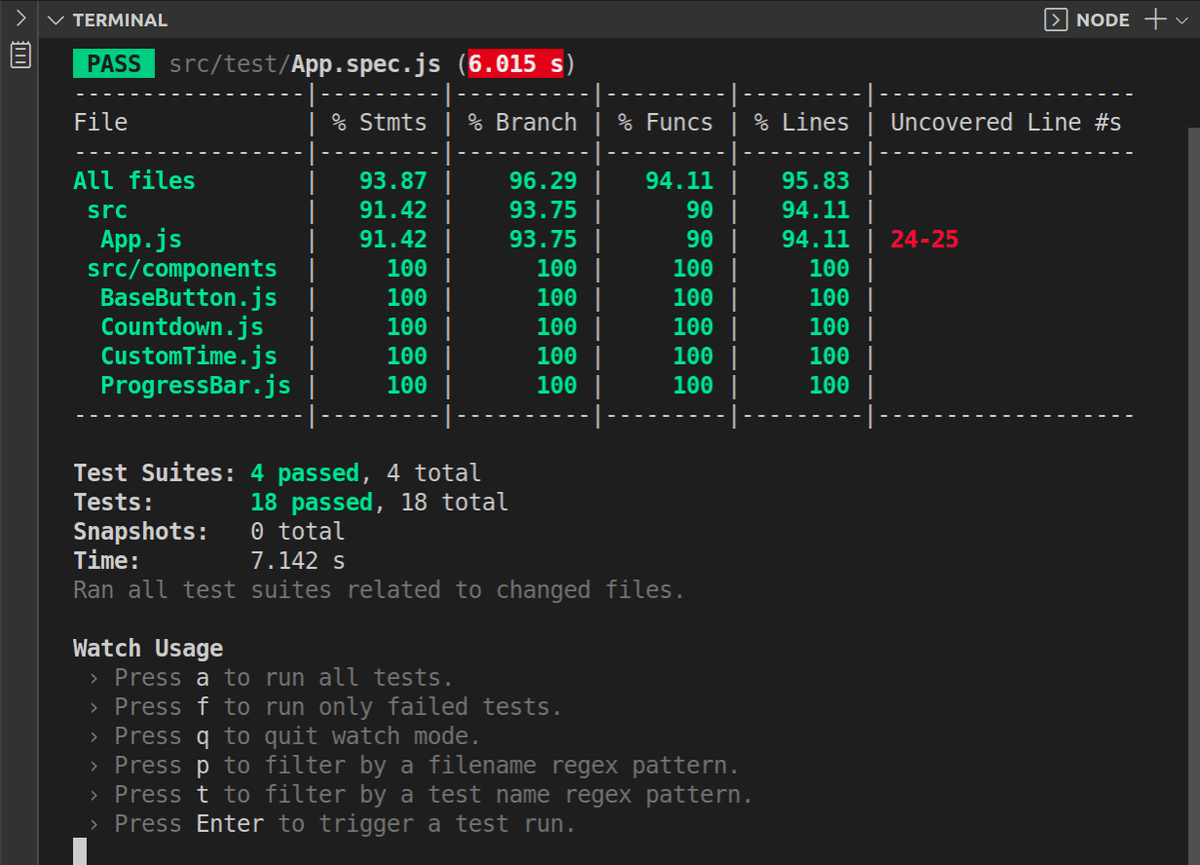
Let's try adding 1 more test case in App.spec.js and see if we can improve that percentage:
it("Shows the current time left when timer is stopped", async () => {
  render(<App />);
  const customTimeComponent = screen.getByPlaceholderText("Enter minutes");
  fireEvent.change(customTimeComponent, { target: { value: "3" } });
  const btnComponent = screen.getByText("Set Minutes");
  fireEvent.click(btnComponent, {});
  const startBtn = screen.getByText("start");
  fireEvent.click(startBtn);
  await act(async () => {
    await new Promise((r) => setTimeout(r, 1000));
  });
  const stopBtn = screen.getByText("stop");
  fireEvent.click(stopBtn);
  screen.getByText("02: 59");
});
Now, if I run the coverage script again, I get the below results:
It seems I still haven't got lines 24-25 tested but nonetheless I improved the coverage percentage and am satisfied with the current result. I personally think the difference to 100% is made by the fact that my tests don't 'test' the state implementation in the components (I don't test that I call setTime or any of the other setters there... and this is how react testing library suggests we approach tests, we don't care about the internal implementation). This is on its own also debatable because if the app grows in complexity and I start adding global state through context api, redux or some other state management library, I will want to have the 'state implementation' tested too (just to be sure nothing breaks).
Thanks for sticking with me until the end of this article. I hope you did like it and that now you do have an understanding about what TDD is and how to go about it. The github repo for this project is here: Repo Link.
I also have the application deployed at this Link.
Thanks for reading my article and stay tuned for more.