

Introduction to git

We have written some code, built some projects, now it's time to think about how to store and maintain our codebase. The answer to that is a Versioning system.
As its name implies, this is a system to keep track of changes in our code and of release versions for our application.
The most popular versioning system today is undoubtedly Git.
Git is a distributed (or decentralised) versioning system. What does 'decentralised' mean? It means that every person working with the system has all the codebase (so the entire history of the project) copied onto his machine, therefore there is no 'central' place with all the code and we don't work with only a part of that code.
This comes in very handy as it allows us to work freely on our projects and then to add our own changes to the project history.
During this article, we will follow an incremental practical approach so that you will get a clear idea of what git is and what it can do for you.
If you do not have installed git, you can do so by downloading it from here.
Once you have it installed, you can run something like:
git version
And you will see the current version:

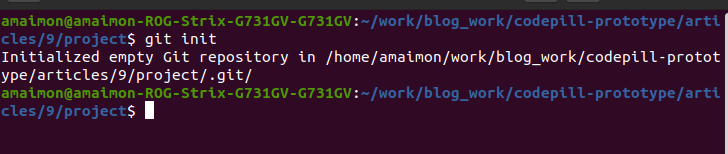
Now that we are all set up and ready to go, let's create a new directory (as always I name mine 'project' for originality's sake 😂) and let's initialize git inside of it. To do that, inside the project directory issue the below command in the terminal:
git init
Once that has run, you will see the following output:
From this point on, git will track everything that happens inside our project directory (file creations, deletions, file changes, etc..).
Don't take my word for that, let's test it out together. In the same terminal window as before run:
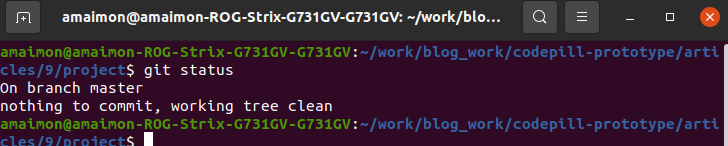
git status
You will see the below:
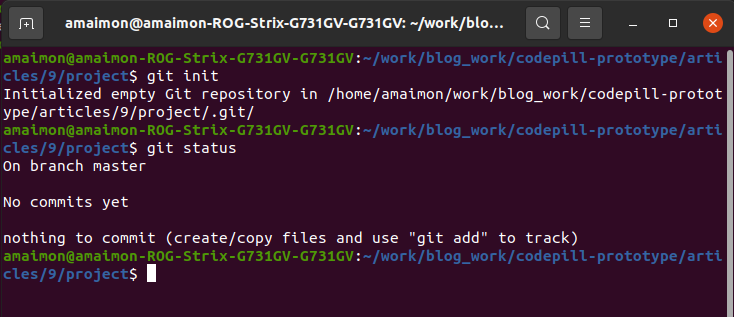
So 'nothing to commit', commiting means adding stuff to the project history. We will now create our first file and write something to it, then we will make a commit. Create an index.html file inside the 'project' directory and paste the below code inside of it:
<!DOCTYPE html>
<html lang="en">
  <head>
    <meta charset="UTF-8" />
    <meta http-equiv="X-UA-Compatible" content="IE=edge" />
    <meta name="viewport" content="width=device-width, initial-scale=1.0" />
    <title>Git intro</title>
  </head>
  <body>
    <p>First commit</p>
  </body>
</html>
Now, if you do git status, you will see the below:
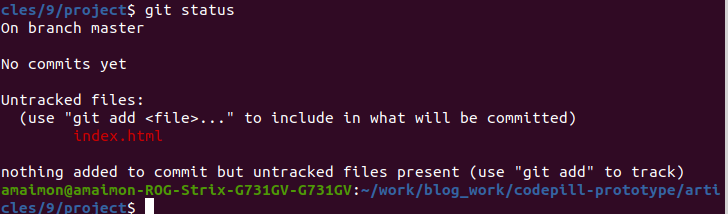
Our file has been tracked by git. It is now in the working tree. This is the first of the 3 git core areas. The 3 working areas are: the working tree (the file is not staged, it is just in a working space), the staging area (here the files/changes are 'staged' or prepared for 'commit') and finally the local repository (this is where all our 'commits' and 'branches' -we'll get to those in a bit- are stored). Everything is put inside a .git directory (you can see it if you run ls -a ).
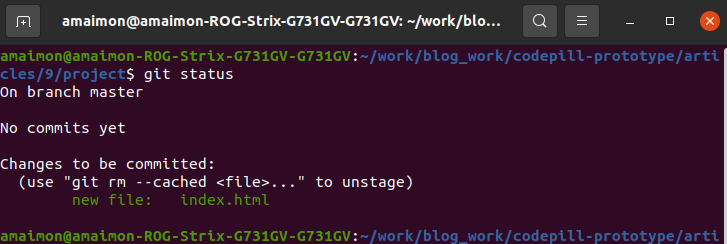
So for now our file is in the working tree. Let's add it to the staging area. Do that by runnig:
git add .
The . arguments tells to git to add all the new files (an alternate way would be to add the file individually so git add index.html and this is useful because sometimes you might want to add only certain files and not all of them).
Now if you run git status, you will now see:
*note that it says we're 'On branch master', this is because git by default will create a local branch called 'master' unless we specify another name. This article was initially written earlier, I think now they call the first branch 'main'.
Now we can commit our file, do that by running:
git commit -m 'first commit'
Now if you run git status again, you will see a clean working area:
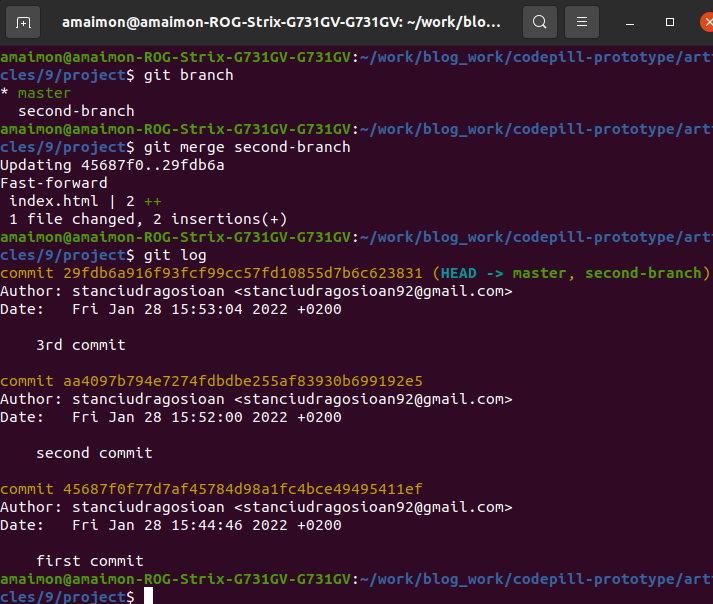
However, if we run the command git branch, we will see that we are on the 'master' branch:

But what is a branch ? Well, it is a particular set of 'commits' grouped together. And you would have multiple such branches in a project. Each feature you develop, usually will have the full history of the project up to that point + your newly added changes. For a better traceability of the code, we structure such changes in branches, so each time I develop a new feature, I will create a fresh branch from the current one, and develop on that branch. In our case, the 'master' branch will be the base branch, and all other branches will be created from it.
We can also see all the commits on a branch by running git log:

*as you can see we are on the master branch, and we have only one commit. We can see here that our only commit is also the 'HEAD' of the branch (meaning the most recent commit on it).
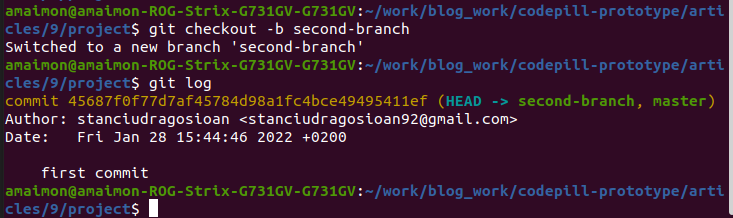
Let's create a new branch from the master branch. Run the below command for that:
git checkout -b second-branch
Note that a second branch has been created as per the terminal output. If we run git log we can see that it has the very same 'first commit' as the master branch, and that it has started from it:
Let's do a second commit. Paste the below second paragraph in the index.html:
<p>Second commit</p>
Next do git add . and git commit -m 'second commit'.
Now let's do a second commit on this 'second branch'. Add one more paragraph to the index.html and do a 3rd commit.
Now if we do git log, we can see that on the second branch we have 3 commits in total:

Now, what if we want to apply the 2 extra commits onto the master branch too (remember that it currently has only 1 commit)?
The way to do that is using a merge . What's that? It is a command that takes some commits from 1 branch and applies them to another branch.
First we need to 'checkout' onto the master branch. Do that by running:
git checkout master
Next run:
git merge second-branch
Now, if we do git log we will see that we are onto the master branch and that it has all 3 commits (2 of which came from the second-branch ):
We could have also used a rebase command. Now the difference between a 'rebase' and a 'merge' is subtle (a merge basically joins commit histories together while a rebase reapplies commits - so it changes the history of the project - ). In our case above, as all commits are in order, there is no difference between using 'rebase' or 'merge' but let me give you an example where a rebase would be better.
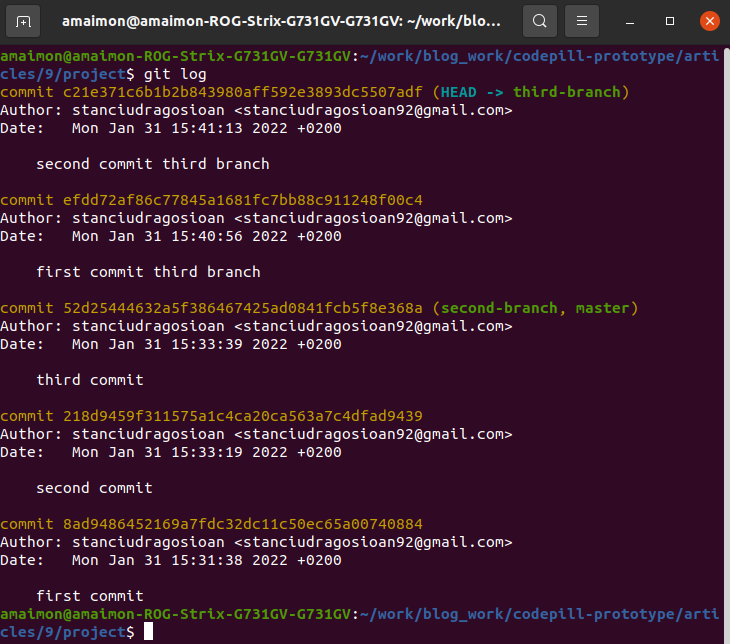
Let's create a new branch from the master so while checked out on the master branch run:
git checkout -b third-branch
Now let's do 2 more commits onto the 'third-branch'. Add 1 more paragraph and commit for each of them as we've done above.
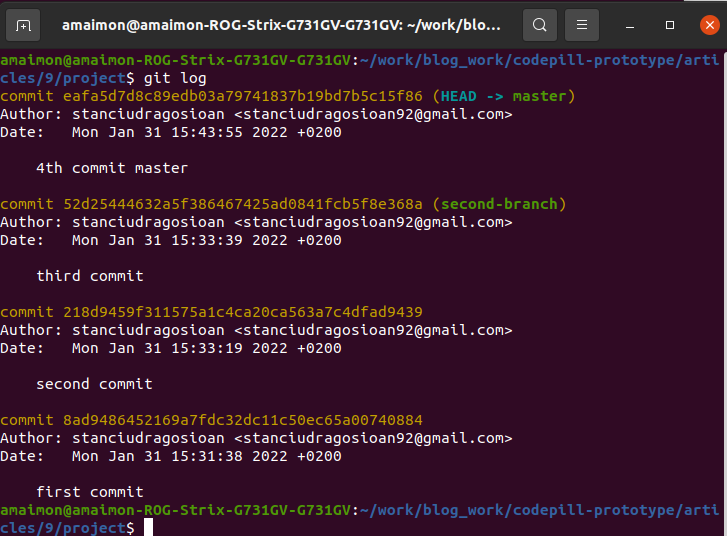
Now, if we do git log on 'third-branch' we can see 5 commits:
Let's now change back to the 'master' branch and do 1 more commit onto it.
Now the commits on master are 4 and look like this:
What if we want that 4th commit onto our third branch too, but we want it applied in chronological order (so before 'first' and 'second' commit on the third branch)? If we use a 'merge' now, it will generate a conflict and it will ask us to 'solve it'.
A conflict occurs when 2 different changes apply to the same line in the same file. In our case the conflict looks like this:
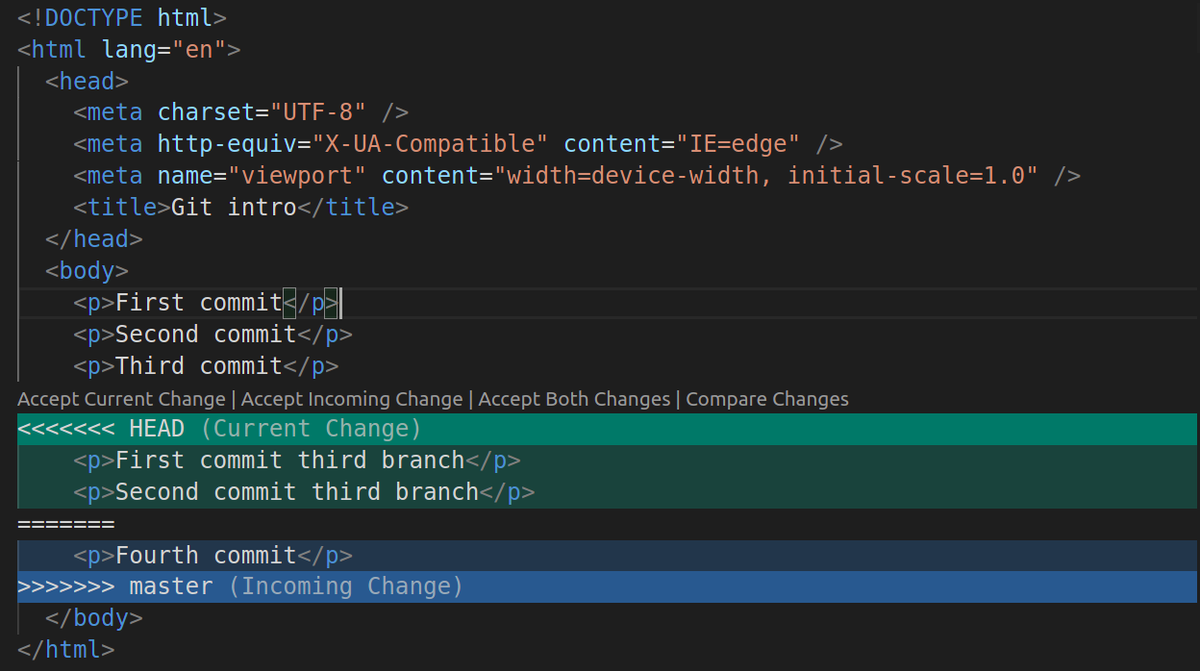
This is how a conflict looks like in the GUI. If we click on 'Accept current change' we will get the 2 commits on the third branch but lose the commit from the master. If we accept the 'incoming change' we lose the 2 commits from the 'third-branch' but we get the 4th commit from the master. If we want all changes, we can just click 'accept both', but that would simply put the changes in order (so first the 2 commits from 'third branch' and next as the last commit, the 4th commit from the 'master branch').
* if you tried git merge master from the 'third-branch' and want to 'undo it' you can run:
git merge --abort
But if you look at the 'master' commits you will see the 4 commits and the 'third-branch' has only the first 3 commits from 'master'. If we want the 4 commits from the 'master' to be applied in order on the 'third-branch' we need to use a rebase so we need to 'rebase' 'third-branch' with the master. In order to do that, we need to to 'git checkout' onto the 'third branch'. And then to run:
git rebase master
This will show us the same conflict, but we can fix it in a more elegant way:
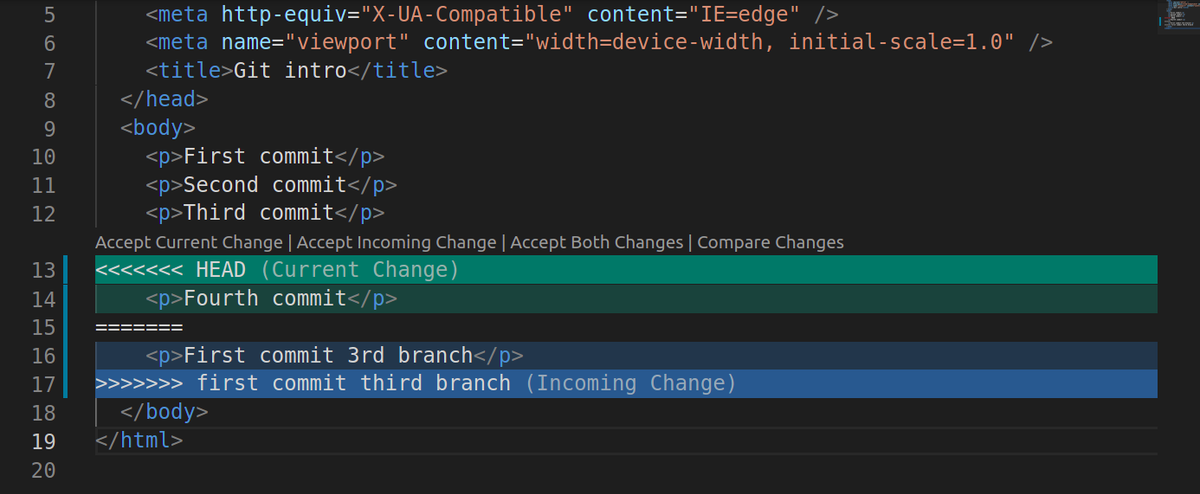
*Note that now we have the conflict between only 2 lines (with merge we had all 3 lines). It basically has us 'choose' between the 'Fourth commit' from 'master' or the 'First commit 3rd branch'.
Now if we click 'Accept both changes' it will put the commits in order (so the 'Fourth commit' from 'master' first and then the 'First commit third branch'). Remember the merge was putting them in order of appearance (so first the 2 commits from 'third-branch' and lastly the missing 'Fourth commit' from master).
You may ask yourself: 'But what about the second commit on third-branch'?
Once you have 'accepted both' changes run:
git add .
Next run:
git rebase --continue
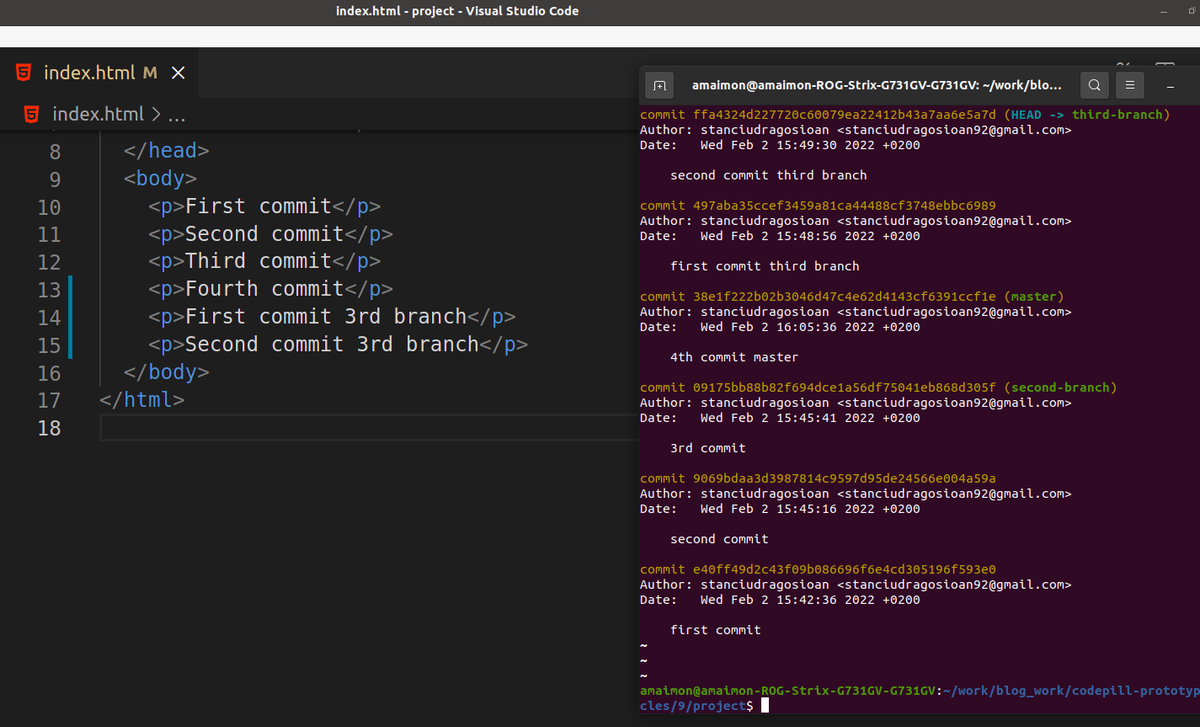
Now you will have all the commits in order on your 'third-branch' just as if you had 'checked out' the 'third-branch' from 'master' after the 4th commit occured.
We can also 'travel back in time' if we need. So let's say we want to 'go back' to a certain commit, we can do that by running git checkout #commitHash so for instance if I want to go back to hash 497aba35ccef3459a81ca44488cf3748ebbc6989 I can run:
git checkout 497aba35ccef3459a81ca44488cf3748ebbc6989
This will give you a weird warning that you are in 'detached HEAD state':
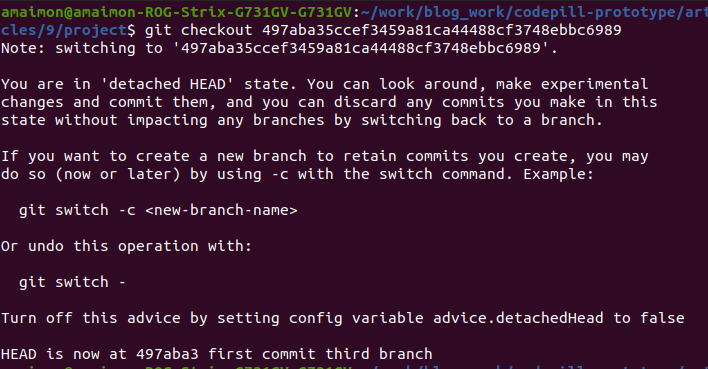
This simply means that you are on no branch at all (so you are somewhat in between branches) but everything works normally, so for instance if you run git log you will see all the commits up to 497aba35ccef3459a81ca44488cf3748ebbc6989.
In this 'detached head' state you can do all sorts of experimental changes (so for instance a new commit, etc...). You can do anything so just play along some more. At the end just create a new branch so git checkout -b detached-head-experiment-branch and merge/rebase your changes onto the target branch.
The final thing I will show you (for now at least 😂) is how to create a github repo.
Since you want to show your awesome code to the world, you need to use a git provider.
Git providers are these companies that offer you a web platform for storing and interacting with your git repositories and to name just a few we can look at: github , bitbucket , gitlab , etc...
If you want to work with one of them, you simply need an account. Once you are logged into the platform just click on the '+' icon in the top right corner of the web interface and select the 'New repository' option:
You will get a page like this:
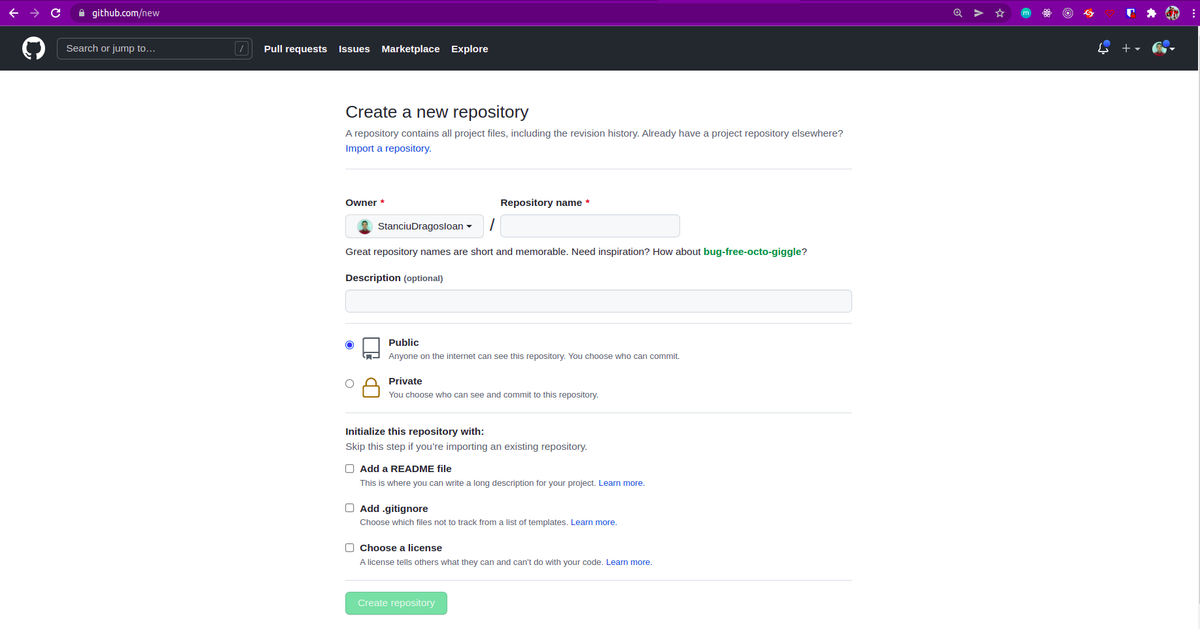
Give it a name and then hit the 'Create repository' button. You will then see this:
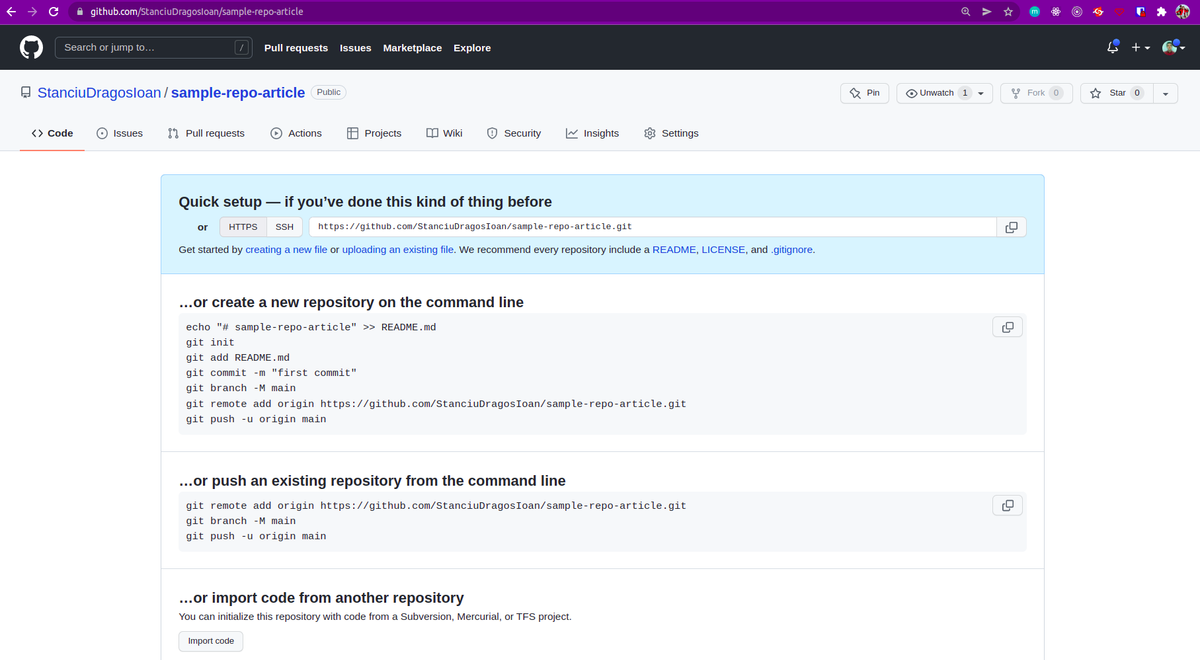
Copy the git remote add origin https://... line and go back to the terminal in your project. Paste the command there and run it. Then you can run:
git push origin --all
This command will push all your branches onto the remote repo and you will now see this:
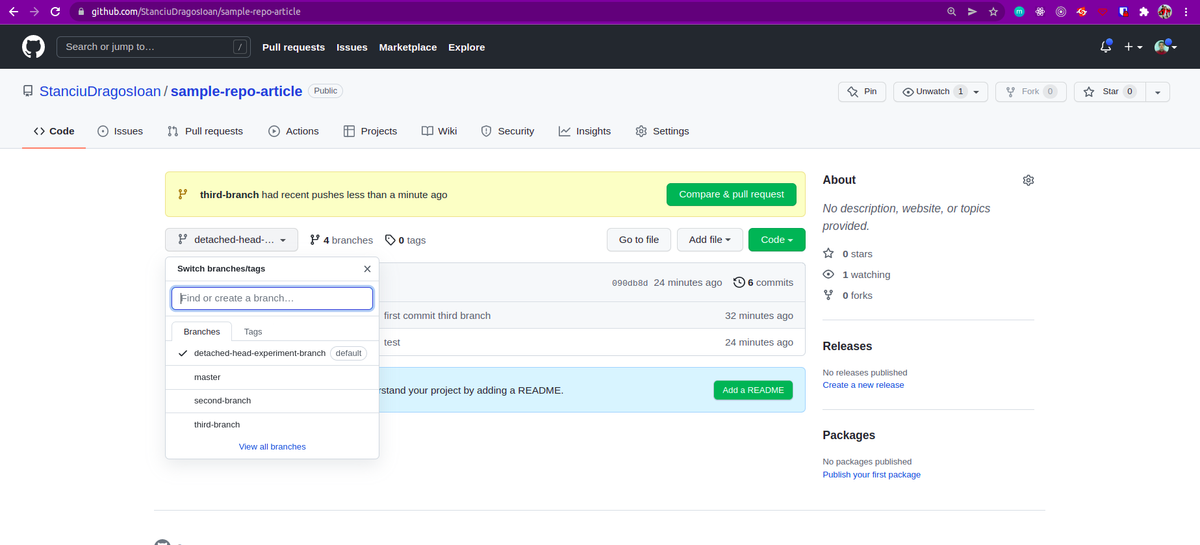
Typically you would push a branch individually (e.g. git push origin master ). In this case the 'origin' is the 'remote repo' (the one on the web, as opposed to the 'local one' which is its copy from your computer).
If you stuck with me till now, I do hope you have now a good understanding of git and know how to use github a bit.
Here's a repo link with all the 'git' code we wrote so far. Click around in the interface there to get familiar with it (the repo is public so you can look at it even without an account but I do encourage you to create your own account and make your own repos).