As the title involves, this article represents an introduction to web development. We will see very briefly how the web works and we will get a bit familiar with the main technologies of the web (namely HTML , CSS and JavaScript).
How the web works
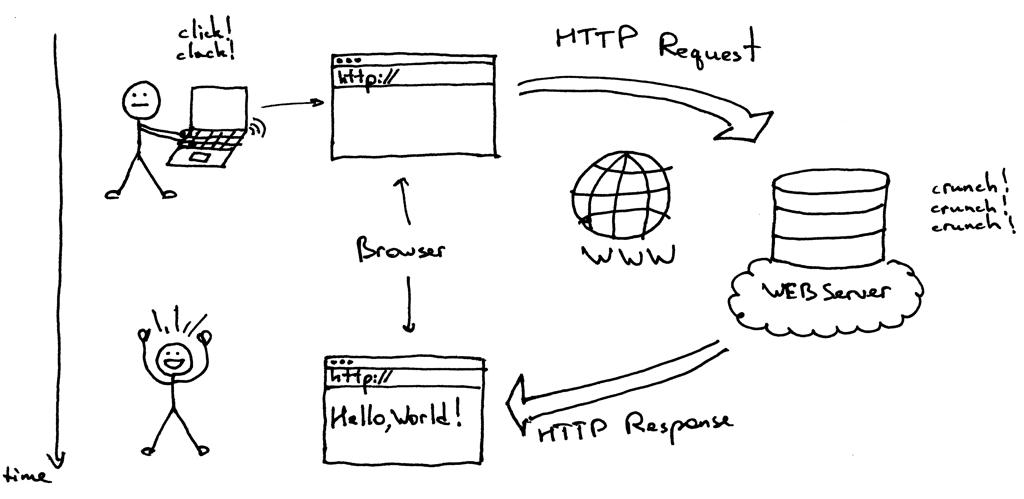
The web is like a huge network (it reaches all over the world, and anyone can 'talk' to anyone via this network).However, the main logic behind a webpage is pretty simple, the user (that's you) also called the 'client' makes an http request to a webserver. The webserver, answers the request, with the required content (let's say a webpage):
Of course there are many types of content we can request from a server (we can have a simple webpage but also a video, a game, etc...) and we will not dive deep into this for now. We can also have multiple types of HTTP Requests like: GET, POST, PUT, PATCH, DELETE. Feel free to read about them, but I think for this introductory article, we do not need to look at them in detail.
HTML, CSS, JS basics
HTML stands for HyperText Markup Language. Remember, it is a markup language not a programming one (so it can represent content but it does not 'do' anything/it has no logic/ it is NOT a programming language). HTML defines the meaning and structure of web content. It uses tags for defining blocks of content. Some examples of tags would be a header ( h1 ) or a paragraph ( p ).
Usually tags come in pairs (an opening and a closing one so <p> text here...</p> but there can also be self closing tags like <img src="sample.jpg" alt="sample pic" />).
Note that beside the opening and closing tags, an HTML element can also have attributes, which are properties that further configure the element (specifying the source for the image like the src attribute, or a description of the image like the alt attribute, an attribute which is very important for SEO and accessibility).
For better understanding, let's create quickly a basic webpage with some text on it. Copy the below code and paste it in an index.html file. Ignore the unknown tags or attributes for now, little by little you will learn about all of them.
<!DOCTYPE html>
<html lang="en">
  <head>
    <meta charset="UTF-8" />
    <meta
      name="viewport"
      content="width=device-width,
      initial-scale=1.0" />
    <title>My first wepbage</title>
  </head>
  <body>
    <h1>This is my first webpage</h1>
  <p>I am very excited to further develop it.</p>
  </body>
</html>
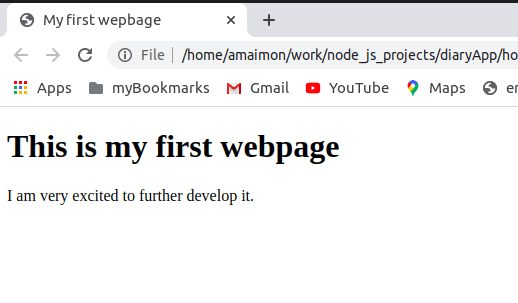
Open the page you just created in a browser and you will see some plain looking, simple page:
* Note how the title tag is reflected in the title of the browser tab.
CSS - Cascading Style Sheets
In order to make our little webpage look better, let's add some CSS to it. CSS stands for Cascading Style Sheets. This means that the 'styles' we set with our CSS code, are applied from top to bottom in a cascading way. The same can be said about CSS links (so they take effect in a cascading order, with the ones on the bottom overwriting the ones above).
CSS has no logic behind it but it is basically a language that describes the presentation of an HTML page.
In order to add CSS to our document, we can use a link such as <link rel="stylesheet" href="myStyle.css" />, an inline style attribute such as <p style="color:red;">my red text here..</p> or a <style> </style> tag in the page head. For this basic demo, we will use a style tag so add it as per below:
 <!DOCTYPE html>
  <html lang="en">
    <head>
      <meta charset="UTF-8" />
      <meta
        name="viewport"
        content="width=device-width,
        initial-scale=1.0" />
      <title>My first wepbage</title>
      <style>
        /* css rules here */
      </style>
    </head>
    <body>
      <h1>This is my first webpage</h1>
      <p>I am very excited to further develop it.</p>
    </body>
  </html>
CSS can "style" elements by selecting them. Let's say we want to select a paragraph and apply some styles to it. This is how you select a paragraph with css:
<!DOCTYPE html>
<html lang="en">
  <head>
    <meta charset="UTF-8" />
    <meta
      name="viewport"
      content="width=device-width,
      initial-scale=1.0" />
    <title>My first wepbage</title>
    <style>
      /* css rules here */
      p {
        display: block;
        margin: auto;
        font-size: 2rem;
        background: blue;
        border: 5px solid #ccc;
        color: #fff;
        text-align: center;
        width: 30rem;
        padding: 1rem;
        border-radius: 15px;
      }
    </style>
  </head>
  <body>
    <h1>This is my first webpage</h1>
    <p>
      I am very excited to further
        develop it.
    </p>
  </body>
</html>
Note how the styles changed with a single CSS rule for the paragraph. However, our approach is not ideal. The reason for this is that usually css rules complexity gets out of control if we are not careful. In order for the complexity to be kept under control (and for the rules not to conflict with each other) we need the CSS rules to be as specific as possible. We can increase the specificity by moving the rule we wrote inside a class.
We do this by changing the rule (specifying that it applies to a class instead of a paragraph selector):
<!DOCTYPE html>
    <html lang="en">
      <head>
        <meta charset="UTF-8" />
        <meta
          name="viewport"
          content="width=device-width,
          initial-scale=1.0" />
        <title>My first wepbage</title>
        <style>
          /* css rules here */
          .blue-card {
            display: block;
            margin: auto;
            font-size: 2rem;
            background: blue;
            border: 5px solid #ccc;
            color: #fff;
            text-align: center;
            width: 30rem;
            padding: 1rem;
            border-radius: 15px;
          }
        </style>
      </head>
      <body>
        <h1>This is my first webpage</h1>
        <p class="blue-card">
          I am very excited to further
            develop it.
        </p>
      </body>
    </html>
Note how the styles apply in the exact same way and now if we want the same styles on a different paragraph, we just have to apply the class="blue-card" to it.
Let's add one more class for the header.
 <!DOCTYPE html>
      <html lang="en">
        <head>
          <meta charset="UTF-8" />
          <meta
            name="viewport"
            content="width=device-width,
            initial-scale=1.0" />
          <title>My first wepbage</title>
          <style>
            /* css rules here */
            .blue-card {
              display: block;
              margin: auto;
              font-size: 2rem;
              background: blue;
              border: 5px solid #ccc;
              color: #fff;
              text-align: center;
              width: 30rem;
              padding: 1rem;
              border-radius: 15px;
            }

            .header {
              display: block;
              margin: auto;
              text-align: center;
              background: green;
              color: #fff;
              padding: 1rem;
              font-size: 2.5rem;
              width: 30rem;
              border: 8px solid #000;
              padding: 1rem;
              border-radius: 15px;
              margin-top: 1rem;
              margin-bottom: 1rem;
            }
          </style>
        </head>
        <body>
          <h1
            class="header"
            >
              This is my first webpage</h1>
          <p class="blue-card">
            I am very excited to further
              develop it.
          </p>
        </body>
      </html>
Now the styles for the header have also changed. Feel free to change the colors or play around with the background of the page.
JavaScript
JavaScript is a highly interactiv, dynamic, programming language. It can add logic to our webpage. It can make it 'do' and 'remember' stuff and add interactivity to it.
I will not do a generic introduction to JavaScript, as this is not the place for it, I will just show you how to add JavaScript to your webpage and then, we will move on to building the application.
In order to add JavaScript to a page, we have to use a <script></script> tag. The script tag can reference a file, like this:
<script src="myScript.js"> </script>
In the case above, the JavaScript code is inside the myScript.js file. However, we can also have the JavaScript code directly in the script tag:
<script>//code that does stuff here</script>
For our introductory demo, we will use the latter approach and write the code directly inside the script tag.
Start by adding a script tag and an input field in the webpage:
<!DOCTYPE html>
<html lang="en">
<head>
<meta charset="UTF-8" />
<meta
name="viewport"
content="width=device-width,
initial-scale=1.0" />
<title>My first wepbage</title>
<style>
/* css rules here */
.blue-card {
display: block;
margin: auto;
font-size: 2rem;
background: blue;
border: 5px solid #ccc;
color: #fff;
text-align: center;
width: 30rem;
padding: 1rem;
border-radius: 15px;
}
.header {
display: block;
margin: auto;
text-align: center;
background: green;
color: #fff;
padding: 1rem;
font-size: 2.5rem;
width: 30rem;
border: 8px solid #000;
padding: 1rem;
border-radius: 15px;
margin-top: 1rem;
margin-bottom: 1rem;
}
#myInput {
width:10rem;
height:2rem;
display:block;
margin:auto;
border:2px solid #ddd;
margin-top:2rem;
}
</style>
</head>
<body>
<h1
class="header"
>
This is my first webpage</h1>
<p class="blue-card">
I am very excited to further
develop it.
</p>
<input type="text" id="myInput" placeholder="type in me 😉" />
<script>
</script>
</body>
</html>
Note that we have an id of myInput for the input field, so we will grab onto it with a JavaScript selector (similar to the CSS one). Add the code below to your script:
<!DOCTYPE html>
<html lang="en">
<head>
<meta charset="UTF-8" />
<meta
name="viewport"
content="width=device-width,
initial-scale=1.0" />
<title>My first wepbage</title>
<style>
/* css rules here */
.blue-card {
display: block;
margin: auto;
font-size: 2rem;
background: blue;
border: 5px solid #ccc;
color: #fff;
text-align: center;
width: 30rem;
padding: 1rem;
border-radius: 15px;
}
.header {
display: block;
margin: auto;
text-align: center;
background: green;
color: #fff;
padding: 1rem;
font-size: 2.5rem;
width: 30rem;
border: 8px solid #000;
padding: 1rem;
border-radius: 15px;
margin-top: 1rem;
margin-bottom: 1rem;
}
#myInput {
width:10rem;
height:2rem;
display:block;
margin:auto;
border:2px solid #ddd;
margin-top:2rem;
}
</style>
</head>
<body>
<h1
class="header"
>
This is my first webpage</h1>
<p class="blue-card">
I am very excited to further
develop it.
</p>
<input type="text" id="myInput" placeholder="type in me 😉"/>
<script>
//grab the input value typed by the user
const input = document.getElementById("myInput");
//grab the header (to write input value in it)
const header = document.querySelector(".header");
//add an 'event' to trigger when the user types
input.addEventListener("input", function (event) {
//grab the typed value
const newHeaderValue = event.target.value;
//set the typed value as new header value;
header.innerHTML = newHeaderValue;
});
</script>
</body>
</html>
Now whatever you type in the field will get put in the green header.
This is how you 'connect' HTML code with a CSS and JavaScript. These three technologies together, can do many awesome things and you will love to use them.
If you never wrote a line of code, I bet you feel a bit like a wizard now. At least that's how I felt when I first connected some HTML code with a CSS file and some JavaScript code.
I really hope you enjoyed this introduction to web development. In the next post, we will be building a real application. If you want to already start working on that, click Here.