Routing is a fundamental component in any web application. It refers to the fact that a certain URL in the browser is supposed to be handled by a specific block of code.
Server side routing
This means that if I go to /myCoolRoute, some code should be executed and it should handle my response as per the route. In Express, we would do it like so:
This is how it would work withExpress 3, in 4 there are some changes, allowing us to chain route handlers and map them to specific HTTP methods like so:
app
  .route("/myCoolRoute")
  .get((req, res) => {
    res.send("Get a random route response");
  })
  .post((req, res) => {
    res.send("Add some data");
  })
  .put((req, res) => {
    res.send("Update the the data");
  });
Client side routing
Client side routing is just like server side one, the only difference is that it runs in the browser. This means that your website pages are mapped to URLs and upon the URL being requested a certain page is loaded. That is how Single Page Apps routing works.
This is a quick and very basic client side routing implementation with vanilla JS:
<!DOCTYPE html>
<html>
  <head>
    <title>Client-Side Routing Example</title>
  </head>
  <style>
    body {
      font-family: Arial, sans-serif;
      margin: 0;
      padding: 0;
      background-color: #f0f0f0;
    }

    header {
      background-color: #333;
      color: #fff;
      padding: 10px 0;
      text-align: center;
    }

    nav ul {
      list-style: none;
      padding: 0;
      display: flex;
      justify-content: center;
    }

    nav li {
      margin: 0 20px;
    }

    nav a {
      text-decoration: none;
      color: #fff;
      font-weight: bold;
    }

    nav a:hover {
      text-decoration: underline;
    }

    #content {
      background-color: #fff;
      padding: 20px;
      margin: 20px;
      box-shadow: 0 0 5px rgba(0, 0, 0, 0.2);
    }

    h1 {
      text-align: center;
    }
  </style>
  <body>
    <header>
      <nav>
        <ul>
          <li><a href="#/">Home</a></li>
          <li><a href="#/about">About</a></li>
          <li><a href="#/contact">Contact</a></li>
        </ul>
      </nav>
    </header>

    <div id="content">
      <!-- Content will be updated dynamically -->
    </div>

    <script>
      // Function to handle routing and updating content
      function handleRoute() {
        const path = window.location.hash.slice(1); // Get the path without the '#' symbol
        const contentDiv = document.getElementById("content");

        if (path === "" || path === "/") {
          contentDiv.innerHTML = "<h1>Home Page</h1>";
        } else if (path === "/about") {
          contentDiv.innerHTML = "<h1>About Us</h1><p>About Page Here!</p>";
        } else if (path === "/contact") {
          contentDiv.innerHTML =
            "<h1>Contact Us</h1><p>Email us at: contact@example.com</p>";
        } else {
          contentDiv.innerHTML = "<h1>Page Not Found</h1>";
        }
      }

      // Initial page load and hash change event listener
      window.addEventListener("hashchange", handleRoute);
      window.addEventListener("load", handleRoute);
    </script>
  </body>
</html>
But before we go into that, we should understand a bit the File Based Routing that
NextJS offers.
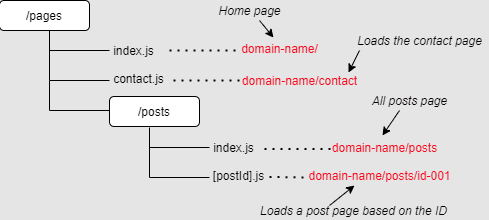
In NextJS routing is based on pages (these are .js, .ts, .tsx, or .jsx files). All these files are based in the /pages directory and hence available as routes defined based on the file names. NextJS will allow for us to fetch the pages based on their name and on their placement in the /pages directory:
So if we go to /, we will see the index page, if we go to /contact we see the contact page and so on. Note how we can nest directories as well, so if we have a /posts directory, we will serve the index page from inside of it (and we can have multiple nested directories).
*Note that starting with Next 13 the file based routing is based in the /app directory.
Now that we know about File Based Routing we can move on to discuss a bit the main ways in which
NextJS allows us to 'route' in our application.\
Static Site Generation (SSG)
This is the default configuration of a NextJS project. Without any extra configuration, when we create pages they will be statically generated on the server at build time and served to the client. Once having been generated, the static content can be cached and re-used upon requests. This is an ideal case if we do not need additional data for our pages.
If we need additional data (say we have to make an http request and fetch some data to inject in our page so we delve into what we call data fetching strategies) we need to use getStaticProps.
For this use case we simply need to export a function named getStaticProps from a page.
*Note that this function will run only on the server (so the client code will not expose its contents, meaning we can for instance make some DB request here). A page implementing this function would look like so:
export default function MyCoolPage({ data }) {
  // Render data...
  return data.map((item) => <p>item.contents</p>);
}

// This gets called on every request
export async function getStaticProps() {
  // Fetch data from external API
  const res = await fetch(`https://.../data`);
  const data = await res.json();

  // Pass data to the page via props
  return { props: { data } };
}
Although the code of the function runs only on the server, the props are returned on the client side (so don't expose something super sensitive like some private API key or DB credentials 😅).
Server Side Rendering (SSR)
If we use SSR, then NextJS will re-generate the contents of the page upon each and every request.
This is useful if we have content that updates frequently and we need to 'refresh it' all the time. If we do not have this specific need, it is recommended to use SSG as the page is not 're-built' that often.
In order to implement SSR, we need to export from our pages the getServerSideProps method like so:
export default function MyCoolSSRPage({ data }) {
  // Render data...
  return data.map((item) => <p>item.contents</p>);
}

// This gets called on every request
export async function getStaticProps(context) {
  // Access request information from the context object.
  const { params, req, res, query } = context;

  // Fetch data from external API
  const res = await fetch(`https://.../data`);
  const data = await res.json();

  // Pass data to the page via props
  return { props: { data } };
}
*Note how we can read request parameters and other useful pieces of information from the context object.
Incremental Static Regeneration (ISR)
If we need sort of a 'middleman' between SSG and SSR, NextJS has got us covered with ISR.
This means that we can 'combine' the best of both worlds (namely we can create or update static pages after the build). To use this configuration we simply need to add the revalidate prop to getStaticProps.
function Blog({ posts }) {
  return (
    <ul>
      {posts.map((post) => (
        <li key={post.id}>{post.contents}</li>
      ))}
    </ul>
  );
}

// This function gets called at build time on server-side.
export async function getStaticProps() {
  const res = await fetch("https://.../posts");
  const posts = await res.json();

  return {
    props: {
      posts,
    },
    // Next.js will attempt to re-generate the page:
    // - When a request comes in
    // - At most once every 10 seconds
    revalidate: 10, // In seconds
  };
}

// This function gets called at build time on server-side.
// It may be called again, on a serverless function, if
// the path has not been generated.
export async function getStaticPaths() {
  const res = await fetch("https://.../posts");
  const posts = await res.json();

  // Get the paths we want to pre-render based on posts
  const paths = posts.map((post) => ({
    params: { id: post.id },
  }));

  // We'll pre-render only these paths at build time.
  // { fallback: 'blocking' } will server-render pages
  // on-demand if the path doesn't exist.
  return { paths, fallback: "blocking" };
}

export default Blog;
Apart from getStaticProps please do notice the getStaticPaths method. This method is used to generate the dynamic paths for our content (in this case for the blog posts). If we use it, NextJS will statically pre-render all the possible dynamic paths for all our posts (note how it maps through them and returns a params object). We would typically use this method when we statically pre-render pages that use dynamic route paths.
Client Side Rednering (CSR)
Up until now we have seen only 'server side rendering' approaches, let's have a look at client side rendering.
With this approach the browser downloads a minimalistic skeleton of the page and the required JS code. Then the JS code updates the DOM and renders the page.
A slight disadvantage of this approach is the fact that the user might see a slight delay in page load when it first loads (as the contents are not fully rendered until all the JS code is downloaded, parsed and run).
NextJS allows us to implement CSR either by using the useEffect hook (and perform our data fetching inside of it) or through libraries like SWR.
This library's name is actually 'Stale While Revalidate' and it exposes a hook to us. This hook allows us to call a fetcher function and make an http request to get our data.
Unlike SSR, CSR does not help us at all on the SEO side of things (so web crawlers cannot actually pre-parse our content and our google search rank will go down because of that).
But enough with the talk, let's just have a quick look at some example. In a terminal run the below command:
npx create-next-app rendering-examples
This will generate a simple NextJS project for us. Open it in a terminal and then run the below command to install TailwindCSS:
npm install -D tailwindcss postcss autoprefixer
Next run:
npx tailwindcss init -p
Next, paste the below in the tailwind.config.js:
/** @type {import('tailwindcss').Config} */
module.exports = {
  content: [
    "./app/**/*.{js,ts,jsx,tsx,mdx}",
    "./pages/**/*.{js,ts,jsx,tsx,mdx}",
    "./components/**/*.{js,ts,jsx,tsx,mdx}",

    // Or if using `src` directory:
    "./src/**/*.{js,ts,jsx,tsx,mdx}",
  ],
  theme: {
    extend: {},
  },
  plugins: [],
};
Finally, in the a globals.css file from inside the /styles directory, paste the below
lines up top in the file:
Before moving on to the creation of our pages, import the globals.css file inside the _app.js file from inside /pages
Next, we can create our first page, in the /pages directory, create a file named ssg.js and inside of it paste:
export default function SSG() {
  return (
    <div className="flex flex-col mb-4 items-center justify-center h-screen">
      <div className="w-1/3">
        <h1 className="text-3xl font-bold mb-5">
          I am a statically generated page
        </h1>

        <p className="text-3xl font-bold">
          My contents have been generated on the server initially and are just
          reused, I never change.
        </p>
        <p className="text-3xl font-bold">
          I have been statically generated at build time and I am served to the
          client. You can cache my contents for an even faster delivery (maybe
          through a CDN).
        </p>
      </div>
    </div>
  );
}
Now if you run yarn dev from the terminal and go to http://localhost:3000/ssg, you should see your static page. This is the most basic type of page that we can create, it is statically generated, no data changes on it, it is easely cache-able and we can serve it quickly./
/
Next, create a second page, namely a ssghttp.js file. This will be our statically generated page that will also do some data fetching. Inside of it paste the below:
import Link from "next/link";
import "../app/globals.css";
const SSGHttp = ({ posts }) => {
  return (
    <div className="flex flex-col mb-4 items-center justify-center min-h-screen">
      <div className="w-1/3">
        <h1 className="text-3xl font-bold mb-5 mt-[33vh]">
          I am a statically generated page but I also fetch some data
        </h1>

        <p className="text-3xl font-bold">
          I have been pre-rendered at build time and I use props returned from
          calling the
          <Link
            className="ml-5 text-blue-600 hover:text-blue-800 hover:underline"
            href="https://nextjs.org/docs/pages/building-your-application/data-fetching/get-static-props"
            target="_blank"
          >
            getStaticProps()
          </Link> method
        </p>
        <p className="text-3xl font-bold">
          Below you can see the data I fetched behind scenes:
        </p>
        <h2 className="text-xl font-bold m-5 text-center">User Posts:</h2>
        {posts.map((p) => (
          <div
            class="bg-gray-800 text-white shadow-md rounded-lg mt-5"
            key={p.id}
          >
            <div class="px-6 py-4">
              <div class="font-bold text-xl mb-2">{p.title}</div>
              <p>{p.body}</p>
            </div>
            <div class="px-6 py-4">
              <p class="text-sm">Id: ${p.id}</p>
            </div>
          </div>
        ))}
      </div>
    </div>
  );
};
export default SSGHttp;

export const getStaticProps = async () => {
  const data = await fetch(
    "https://jsonplaceholder.typicode.com/posts?_limit=10"
  );
  const posts = await data.json();

  return {
    props: {
      posts,
    },
  };
};
Now, if you go to http://localhost:3000/ssghttp you will see a statically served page that hasdynamic data injected into it.
Let's now move on to SSR, create an ssr.js file inside /pages and paste the below inside:
import Link from "next/link";
export default function SSR({ users, headers }) {
  return (
    <div className="flex flex-col mb-4 items-center justify-center min-h-screen">
      <div className="w-1/3">
        <p className="text-3xl font-bold">
          I am regenerated on the server upon each request. This means my
          contents are always 100% fresh and up to date. I use the
          <Link
            className="ml-5 text-blue-600 hover:text-blue-800 hover:underline"
            href="https://nextjs.org/docs/pages/building-your-application/data-fetching/get-server-side-props"
            target="_blank"
          >
            getServerSideProps()
          </Link> method to fetch data behind the sceene and access request data.
        </p>
        <p className="text-3xl font-bold">
          Below you can see the data I fetched behind scenes and the request
          headers:
        </p>
        <h2 className="text-xl font-bold m-5 text-center">Request Headers</h2>
        <div className="bg-gray-800 text-white shadow-md rounded-lg mt-5">
          <pre className="text-gray-300 text-sm whitespace-pre-wrap">
            {JSON.stringify(headers, null, "\t")}
          </pre>
        </div>
        <h2 className="text-xl font-bold m-5 text-center">Users Data:</h2>
        {users.map((u) => (
          <div
            class="bg-gray-800 text-white shadow-md rounded-lg mt-5"
            key={u.id}
          >
            <div class="px-6 py-4">
              <div class="font-bold text-xl mb-2">{u.name}</div>
              <p>email address: {u.email}</p>
            </div>
            <div class="px-6 py-4">
              <p class="text-sm">Id: ${u.id}</p>
            </div>
          </div>
        ))}
      </div>
    </div>
  );
}

export const getServerSideProps = async (context) => {
  const data = await fetch(
    "https://jsonplaceholder.typicode.com/users?_limit=10"
  );
  const users = await data.json();

  const { req } = context;

  const { headers } = req;

  return {
    props: {
      users,
      headers,
    },
  };
};
Now, if you go to http://localhost:3000/ssr you will see a sdynamically built page, that is re-rendered on the server upon request and can access 3rd party data plus the request/response lyfecycle data.
Next, let's move to ISR which is a combination of statically generated content with dynamic data injected and revalidated just when needed. Create an isr.js page and paste inside of it the below:
import Link from "next/link";
const ISR = ({ posts }) => {
  return (
    <div className="flex flex-col mb-4 items-center justify-center min-h-screen">
      <div className="w-1/3">
        <h1 className="text-3xl font-bold mb-5 mt-[33vh]">
          I am a statically generated page but I also fetch some data and I
          revalidate my contents every 10 seconds
        </h1>

        <p className="text-3xl font-bold">
          I am regenerated on the server upon each request. This means my
          contents are always 100% fresh and up to date. I use the
          <Link
            className="ml-5 text-blue-600 hover:text-blue-800 hover:underline"
            href="https://nextjs.org/docs/pages/building-your-application/data-fetching/get-server-side-props"
            target="_blank"
          >
            getServerSideProps()
          </Link>
          method to fetch data behind the scene.
        </p>
        <p className="text-3xl font-bold">
          Below you can see the data I fetched behind scenes:
        </p>

        <h2 className="text-xl font-bold m-5 text-center">Posts Data:</h2>
        {posts.map((p) => (
          <div
            key={p.id}
            className="bg-gray-800 text-white shadow-md rounded-lg mt-5"
          >
            <div className="px-6 py-4">
              <p className="font-bold text-xl mb-2">{p.title}</p>
              <p>{p.body}</p>
            </div>
            <div className="px-6 py-4">
              <p className="text-sm">Id: ${p.id}</p>
            </div>
          </div>
        ))}
      </div>
    </div>
  );
};

export default ISR;

export const getStaticProps = async (context) => {
  console.log("getStaticProps invoked");
  const data = await fetch(
    "https://jsonplaceholder.typicode.com/posts?_limit=10",
    { next: { revalidate: 1 } }
  );

  const posts = await data.json();

  return {
    props: {
      posts,
    },
    revalidate: 10, // Revalidate every 10 seconds
  };
};
If you want to actually test the 10 seconds revalidation flag, you can do so in the following way:
First of all, clone this repo on your local machine. Next, run it (with npm run dev so that changes reflect automatically through nodemon) and call the http://localhost:4000 endpoint inside the fetch call from the getStaticProps from inside isr.js. Next run:
npm run build
Once the build command is done run:
npm start
Now, if you go to http://localhost:3000/isr, and then change some text from the api response from the small express project you cloned, you will see that in 10 seconds the change will be picked by your NextJS app and refetched/displayed.
Finally, let's do a Client Side Rendered page too, create a csr.js file and paste the below inside:
"use client";
import Link from "next/link";
import { useState, useEffect } from "react";
const CSR = () => {
  const [data, setData] = useState([]);

  useEffect(() => {
    const fetchData = async () => {
      const response = await fetch(
        "https://jsonplaceholder.typicode.com/posts?_limit=10"
      );
      if (!response.ok) {
        throw new Error(`HTTP error! status: ${response.status}`);
      }
      const result = await response.json();
      setData(result);
    };

    fetchData().catch((e) => {
      // handle the error as needed
      console.error("An error occurred while fetching the data: ", e);
    });
  }, []);
  return (
    <div className="flex flex-col mb-4 items-center justify-center min-h-screen">
      <div className="w-1/3">
        <h1 className="text-3xl font-bold mb-5 mt-[33vh]">
          I am a client side rendered page and I too fetch some data from the
          back-end.
        </h1>

        <p className="text-3xl font-bold">
          For my content the browser downloaded a minimalistic skeleton of the
          page and the required JS code. Then the JS code updates the DOM and
          renders the page. I can use client side hooks such as
          <Link
            className="text-blue-600 hover:text-blue-800 hover:underline"
            href="https://react.dev/reference/react/useEffect"
            target="_blank"
          >
            useEffect()
          </Link>
          to fetch data behind the scenes.
        </p>
        <p className="text-3xl font-bold">
          Below you can see the data I fetched behind scenes:
        </p>

        <h2 className="text-xl font-bold m-5 text-center">Posts Data:</h2>
        {data.map((p) => (
          <div
            key={p.id}
            className="bg-gray-800 text-white shadow-md rounded-lg mt-5"
          >
            <div className="px-6 py-4">
              <p className="font-bold text-xl mb-2">{p.title}</p>
              <p>{p.body}</p>
            </div>
            <div className="px-6 py-4">
              <p className="text-sm">Id: ${p.id}</p>
            </div>
          </div>
        ))}
      </div>
    </div>
  );
};

export default CSR;
This is the typical approach you'd use in a pure React application.
Before we finish, in the index.js from inside /pages replace the contents with this:
import Head from "next/head";
import Image from "next/image";
import Link from "next/link";
import styles from "../styles/Home.module.css";
export default function Home() {
return (
<div className={styles.container}>
<Head>
<title>NextJS Rendering Methods</title>
<meta name="description" content="NextJS Rendering Methods" />
<link rel="icon" href="/favicon.ico" />
</Head>
<main className={styles.main}>
<h1 className={styles.title}>
Welcome to <Link href="https://nextjs.org">Next.js!</Link> rendering
project!
</h1>
<p className={styles.description}>
Check the below links and the
<code className={styles.code}>/pages</code> directory
</p>
<div className={styles.grid}>
<Link href="/ssg" className={styles.card} target="_blank">
<h2>SSG →</h2>
<p>
Find in-depth information about Statically Generated Pages in
NextJS.
</p>
</Link>
<Link href="/ssghttp" className={styles.card}>
<h2>SSG with data fetch →</h2>
<p>
Learn how NextJS allows you to fetch data and inject it in
statically generated pages
</p>
</a>
<Link href="/ssr" className={styles.card}>
<h2>SSR →</h2>
<p>All you need to know about Server Side Rendering.</p>
</a>
<Link href="/isr" className={styles.card}>
<h2>ISR →</h2>
<p>
Learn about Incremental Static Generation and data revalidation
</p>
</Link>
<Link href="/csr" className={styles.card}>
<h2>CSR →</h2>
<p>
Last but not least comes Client Side Rendering (never forget the
basics!)
</p>
</Link>
</div>
</main>
<footer className={styles.footer}>
<Link
href="https://vercel.com?utm_source=create-next-app&utm_medium=default-template&utm_campaign=create-next-app"
target="_blank"
rel="noopener noreferrer"
>
Powered by{" "}
<span className={styles.logo}>
<Image src="/vercel.svg" alt="Vercel Logo" width={72} height={16} />
</span>
</Link>
</footer>
</div>
);
}
Now you have a fully functional app, and I do hope you learned a thing or two about rendering in general and particularly about how NextJS handles it. If you want to check your code against mine, you can do so using this repo, also if you want to see a demo of the application, you can do so by following this link.