Notes App

Notes App

Building a real application

Now, that we have 'got our feet wet' and we know how HTML, CSS and JavaScript work together, we can try to put together a little project. This will be an introductory project, and it will represent a nice transition towards more advanced full-stack applications that we will build in the future. We will build a note taking application. The application will only have a client (a 'front page' doing all the logic for us). There will be no server (to store data for us or to import/export data, filter it and do other 'back-end' related stuff). However, the applicaiton will be able to do many things and it will sort of 'mimmick' a real backend.

This project will help you get familiar with how a JavaScript application is built, without any framework. This will help you regardless of which framework you will use (as you will build something using the full power of JavaScript, power on which all the hot frameworks now and I mean React, Angular or VueJS are built).

Here's a link of a live deployment of the application, so you can see what we will build and what it will look like: Link to app.

Test the application a bit before starting, so you get familiar with how it works and what you will be building. Try adding some notes, edit them, delete some and add them back, etc...

Try exporting your notes, delete all the notes and import them back. The import functionality is set so that it prepends the imported notes to the existing ones (so if you import without deleting the current notes, you will simply get the ones imported added to the top of the list of your current ones).

The most important thing to notice about the application, is that it does not need a refresh of the page. Everything you do instantly updates the screen without the need for a refresh or a redirect (note that the URL never changes either, so you are basically staying on the same page continuously, and dynamically manipulate its contents to suit your needs). This is how modern front-end frameworks like React or Angular work.

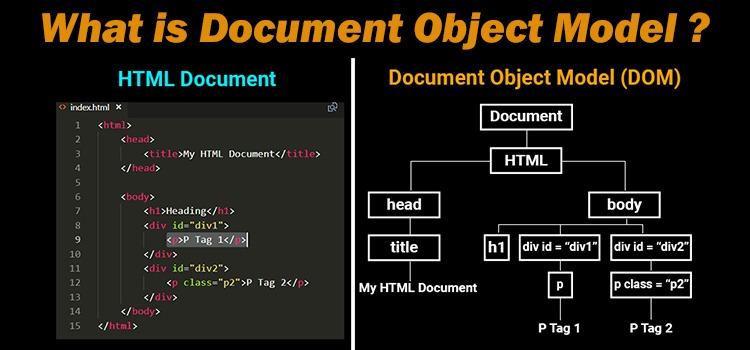
Once you get used to the application, we can start building it. It will be a single page application, it will serve all the contents in an index.html file and all the contents there (the routing from one page/section) to the next, will be performed dynamically, with JavaScript by adding and removing/hiding stuff from the DOM. The Document Object Model (that's the DOM) is a tree-like representation of the webpage, in which all elements of a page are branches of a tree. It looks like this:

document object model

*note that the reason why the CSS selectors are similar to the JS ones is because they actually reference the very same 'branches' from the DOM tree.

So as for the structure of our application, we will have an index.html file, a .css file and two JavaScript files. The two JavaScript files are handling the UI (user interface) and the notes processing. So one will do the notes and the other one will do the interface manipulation (and there will be quite a bit of code in there).

Application start (UI creation)

Start by creating a folder (I named mine project) and create an index.html file in it. Inside the .html file, add the below code:

<html>
  <head>
      <meta charset="UTF-8" />
      <meta name="viewport" content="width=device-width, initial-scale=1.0" />

      <link rel="stylesheet" href="https://stackpath.bootstrapcdn.com/font-awesome/4.7.0/css/font-awesome.min.css" />

      <link rel="stylesheet" href="style.css" />
      <title>Diary App</title>
  </head>

  <body>
      <div class="nav">
          <div id="inputBtn" toShow="test" class="navItem mainInput" tabindex="1">
              Input
          </div>

          <div id="recordsBtn" class="navItem mainInput" tabindex="1">
              Entries
          </div>

          <div id="importExportBtn" class="navItem mainInput" tabindex="1">
              Import/Export
          </div>

      </div>

      <div class="colors">
          <div id="blue" class="color"></div>
          <div id="yellow" class="color"></div>
          <div id="pink" class="color"></div>
      </div>

      <!-- input section -->
      <div id="input">
          <div class="paper">
              <textarea name="note" id="note" cols="120" rows="10"></textarea>
              <button class="add-note">
                  Save Note <i class="fa fa-pencil" aria-hidden="true"></i>
              </button>
          </div>
      </div>

      <!-- entries section -->
      <div class="diaryEntries">
          <div id="deleteNotes" class="navItem" tabindex="1">
              Delete Notes <i class="fa fa-minus-circle" aria-hidden="true"></i>
          </div>
          <input oninput="filter()" class="filter uiText" type="text" value="filter notes" />
          <div id="records">

          </div>
      </div>


      <!-- import export section -->
      <div class="importExport">
          <div class="nav">
              <br />
              <p class="uiText">
                  Use the buttons below to export your notes as a JSON file or to import a
                  JSON notes for your notes feed.
              </p>
              <div id="importBtn" class="navItem import" tabindex="1">
                  Import
                  <input class="import-file" type="file" id="file" name="file" enctype="multipart/form-data" />
                  <i class="fa fa-cloud-upload" aria-hidden="true"></i>
              </div>
              <div id="exportBtn" class="navItem import" tabindex="1">
                  Export
                  <i class="fa fa-cloud-download" aria-hidden="true"></i>
              </div>
          </div>
      </div>


      <div class="alert"></div>
      <script src="notes.js"></script>
      <script src="ui.js"></script>
  </body>
</html>

*note how the ui.js script is under the notes.js one. This means that it can use variables and methods declared in notes.js as JavaScript 'scripts' apply top to bottom.

Next, create the 3 files referenced into the HTML, namely the style.css, notes.js and ui.js. Now, you can open the index.html file in the browser, and you will see some very ugly html code thrown in there. Do not worry, we will right now start styling it and make it look pretty and do awesome things.

We will start working on the style.css file in order to make the first bit of UI look better. Add the below code to the css file:

/* make text non-selectable */
* {
  -webkit-touch-callout: none; /* iOS Safari */
  -webkit-user-select: none; /* Safari */
  -khtml-user-select: none; /* Konqueror HTML */
  -moz-user-select: none; /* Firefox */
  -ms-user-select: none; /* Internet Explorer/Edge */
  user-select: none; /* Non-prefixed version, currently
                          supported by Chrome and Opera */
}

body {
  background: rgb(108, 140, 226);
}

/* navigation */
.nav {
  display: block;
  margin: auto;
  width: 40vw;
}

/* navigation item */
.nav > .navItem {
  background: rgb(38, 0, 255);
  display: inline-block;
  color: #fff;
  border: 2px solid #ccc;
  width: 32%;
  height: 3rem;
  text-align: center;
  padding-top: 10px;
  border-radius: 15px;
  font-size: 1.8rem;
}

.nav > .navItem:hover {
  cursor: pointer;
  transition: 1s;
}

.nav > .navItem:focus {
  outline: none;
}

/* colors */
.colors {
  background: #fff;
  width: 10rem;
  height: 5rem;
  display: block;
  margin: auto;
  margin-top: 2rem;
  border-radius: 30px;
}

.color:hover {
  cursor: pointer;
}

.color:first-child {
  background: blue;
  width: 2rem;
  height: 2rem;
  display: inline-block;
  margin-top: 15%;
  margin-left: 8%;
  border-radius: 50%;
}

.color:nth-child(2) {
  background: rgb(255, 239, 19);
  width: 2rem;
  height: 2rem;
  display: inline-block;
  margin-top: 15%;
  margin-left: 8%;
  border-radius: 50%;
}

.color:nth-child(3) {
  background: pink;
  width: 2rem;
  height: 2rem;
  display: inline-block;
  margin-top: 15%;
  margin-left: 8%;
  border-radius: 50%;
}

/*hide paper initially*/
#input {
  display: none;
}

/* paper styles for the input form */
.paper {
  background: radial-gradient(rgb(248, 246, 246), #ebebe9);
  padding: 60px;
  position: relative;
  width: 80vw;
  display: block;
  margin: auto;
  margin-top: 3rem;
  height: 20rem;
}

.paper,
.paper::before,
.paper::after {
  /* Styles to distinguish sheets from one another */
  box-shadow: 1px 1px 1px rgba(0, 0, 0, 0.25);
  border: 1px solid rgb(199, 198, 198);
}

.paper::before,
.paper::after {
  content: "";
  position: absolute;
  background-color: #e5e2e2;
}

.paper::before {
  right: 15px;
  top: 0;
  transform: rotate(-2deg);
  z-index: -1;
  width: 100%;
  height: 103%;
  margin-top: -1rem;
}

.paper::after {
  top: 5px;
  right: -5px;
  transform: rotate(2deg);
  z-index: -2;
  width: 98%;
  height: 97%;
}

.paper > textarea {
  border: none;
  overflow: auto;
  outline: none;
  -webkit-box-shadow: none;
  -moz-box-shadow: none;
  box-shadow: none;
  font-size: 2rem;
  width: 100%;
  height: 100%;
  background: radial-gradient(#fff, #ebebe9);
  color: black;
  resize: none;
  font-family: Arial, Helvetica, sans-serif;
}

/*hide entries initially*/
.diaryEntries {
  display: none;
}

.add-note {
  background: rgb(156, 154, 154);
  color: #fff;
  outline: none;
  border: 2px solid #eee;
  font-size: 2rem;
  border-radius: 15px;
}

.add-note:hover {
  cursor: pointer;
  background: rgb(39, 37, 37);
  transition: 1s;
}

/* notes style */
.card {
  display: block;
  margin: auto;
  width: 90vw;
  font-size: 2rem;
  background: #f0edd9;
  padding: 1rem;
}

.card.card-fresh > p.text {
  overflow-wrap: break-word !important;
  word-wrap: break-word !important;
  hyphens: auto !important;
  font-family: inherit !important;
}

.invisible {
  display: none;
}

.pencil-note:hover {
  cursor: pointer;
}

.fa-save {
  display: inline !important;
}

#saveEdit:hover {
  cursor: pointer;
}

.fa-times-circle {
  margin-left: 90%;
  margin-bottom: 5srem;
}

.fa-times-circle:hover {
  cursor: pointer;
}

.filter {
  display: none;
  margin: auto;
  margin-top: 2rem;
  width: 20rem;
  height: 3rem;
  font-size: 2rem;
  text-align: center;
  margin-bottom: 1rem;
  outline: none;
  border: 2px solid #000;
  border-radius: 15px;
}

::-webkit-input-placeholder {
  text-align: center;
}

/* delete Notes Button */
#deleteNotes {
  background: rgb(194, 57, 57) !important;
  display: block;
  margin: auto;
  margin-top: 1rem;
  margin-bottom: 1rem;
  color: #fff;
  border: 2px solid #ccc;
  width: 20%;
  height: 3rem;
  text-align: center;
  padding-top: 10px;
  border-radius: 15px;
  font-size: 2rem;
  outline: none;
}

#deleteNotes:hover {
  cursor: pointer;
}

/* import export styles */
.importExport {
  display: none;
}

#file:hover {
  cursor: pointer;
}

.import {
  width: 48% !important;
}

.import:hover,
.import:focus {
  filter: brightness(70%) !important;
}

.import-file {
  opacity: 0;
  width: 100%;
  height: 100%;
  position: absolute;
  top: 0;
  left: 0;
}

#importBtn {
  position: relative;
}

.uiText {
  display: block;
  margin: auto;
  text-align: center;
  font-size: 2rem;
  background: #fff;
  padding: 1rem;
  border-radius: 15px;
  margin-bottom: 2rem;
  color: #524f4f;
  border: 2px solid #ccc;
}

/* alert div styles (used for add and import/export */
.alert {
  margin-top: 5rem;
  max-width: 40rem;
}

/* media queries for responsiveness */
@media (max-width: 1500px) {
  .nav {
    width: 60vw;
  }

  #deleteNotes {
    width: 25%;
  }
}

@media (max-width: 1000px) {
  .nav {
    width: 80vw;
  }
  #deleteNotes {
    width: 30%;
  }
}

@media (max-width: 750px) {
  .nav {
    width: 70vw;
  }
  .nav > .navItem {
    display: block;
    margin: auto;
    margin-bottom: 1rem;
    width: 100%;
  }

  .add-note {
    font-size: 1.5rem;
  }

  .card {
    font-size: 1.5rem;
    width: 70vw;
  }

  #deleteNotes {
    width: 45%;
  }
}

@media (max-width: 590px) {
  .add-note {
    display: block;
    margin: auto;
  }
}

@media (max-width: 500px) {
  #importBtn,
  #exportBtn,
  .navItem {
    width: 100% !important;
  }

  .paper {
    max-width: 50%;
  }

  #deleteNotes {
    width: 75%;
  }
}

Now everything looks nice. We will work for starters on the UI JS script.

First, paste in ui.js the below configuration objects:

const colorsConfig = {
  blue: {
    bgBackground: "#6C8CE2",
    btnBackground: "#2600FF",
    activeBtn: "#050D31",
    btnBorder: "#2600FF",
  },
  yellow: {
    bgBackground: "#fcce03",
    btnBackground: "#ebb852",
    activeBtn: "#ad871d",
    btnBorder: "#ebb852",
  },
  pink: {
    bgBackground: "pink",
    btnBackground: "#f003fc",
    activeBtn: "#97089e",
    btnBorder: "#f003fc",
  },
};

const showHideConfig = {
  inputBtn: {
    show: "#input",
    hide: [".diaryEntries", ".importExport"],
  },
  recordsBtn: {
    show: ".diaryEntries",
    hide: ["#input", ".importExport"],
  },
  importExportBtn: {
    show: ".importExport",
    hide: ["#input", ".diaryEntries"],
  },
};

Based on these 2 configurations we will bring our interface to life. We want when we click on one of the buttons, that the respective section is visible to us. So let's just do that, below the config objects add:

let themeColor = "blue";
let activeSelector = "inputBtn";

const mainInputs = Array.from(document.querySelectorAll(".mainInput"));
mainInputs.forEach((i) => i.addEventListener("click", () => activateTab(i)));

Now we just need to create the activateTab() method:

function activateTab(tab) {
  mainInputs.forEach((i) => {
    i.style.background = colorsConfig[themeColor].btnBackground;
    i.style.border = `2px solid ${colorsConfig[themeColor].activeBtn}`;
  });
  const importExportBtns = Array.from(document.querySelectorAll(".import"));
  importExportBtns.forEach((i) => {
    i.style.background = colorsConfig[themeColor].btnBackground;
    i.style.border = `2px solid ${colorsConfig[themeColor].activeBtn}`;
  });
  tab.style.background = colorsConfig[themeColor].activeBtn;
  activeSelector = tab.id;
  const toShow = document.querySelector(
    `${showHideConfig[activeSelector].show}`
  );
  toShow.style.display = "block";
  const toHideArr = showHideConfig[tab.id].hide;
  toHideArr.forEach((i) => {
    const el = document.querySelector(i);
    el.style.display = "none";
  });
}

Now, if you click on the buttons, you can 'swap' between the 3 tabs of our application.

All is good so far, let's now implement the color toggling method too:

const colorBtns = Array.from(document.querySelectorAll(".color"));
colorBtns.forEach((i) => i.addEventListener("click", () => changeColor(i)));

Let's now add the changeColor() method:

function changeColor(color) {
  themeColor = color.id;
  mainInputs.forEach((i) => {
    i.style.background = colorsConfig[color.id].btnBackground;
    i.style.border = `2px solid ${colorsConfig[color.id].activeBtn}`;
  });
  const importExportBtns = Array.from(document.querySelectorAll(".import"));
  importExportBtns.forEach((i) => {
    i.style.background = colorsConfig[color.id].btnBackground;
    i.style.border = `2px solid ${colorsConfig[color.id].activeBtn}`;
  });
  document.querySelector("body").style.background =
    colorsConfig[color.id].bgBackground;
  if (activeSelector) {
    const btnToStyle = document.querySelector(`#${activeSelector}`);
    btnToStyle.style.background = colorsConfig[color.id].activeBtn;
    btnToStyle.style.border = `2 px solid ${colorsConfig[color.id].activeBtn}`;
  }
}

With this, we can toggle between colors and tabs nicely. The only missing feature is the 'remembering' of what was clicked or what color was selected by the user (say if we refresh the page). With our current setup the application does not 'remember' all of this. All of this data (button clicked, color selected, etc...) is lost.

This data is called state and it is usually hard to manage. In the case of our application it will not be too hard, but imagine if we had more screens or more features. It would quickly get out of hand or we'd have to set up a pretty smart way to do that (imagine if we added 20 more selectors for 20 extra buttons or lables in our already existing screens).

Managing state nicely and under the hood (so we are not concerned with that at all) is one of the things modern frameworks like React, Angular or Vue do, but it's good to have a solid grasp of the concept for any developer.

With all of these in mind, let's make our application 'remember' its current state in between page refreshes by using The Local Storage API. Read in the docs if you want to see how it works, I will just finish the implementation in our ui.js file. Replace everything in the file with:

const colorsConfig = {
  blue: {
    bgBackground: "#6C8CE2",
    btnBackground: "#2600FF",
    activeBtn: "#050D31",
    btnBorder: "#2600FF",
  },
  yellow: {
    bgBackground: "#fcce03",
    btnBackground: "#ebb852",
    activeBtn: "#ad871d",
    btnBorder: "#ebb852",
  },
  pink: {
    bgBackground: "pink",
    btnBackground: "#f003fc",
    activeBtn: "#97089e",
    btnBorder: "#f003fc",
  },
};

const showHideConfig = {
  inputBtn: {
    show: "#input",
    hide: [".diaryEntries", ".importExport"],
  },
  recordsBtn: {
    show: ".diaryEntries",
    hide: ["#input", ".importExport"],
  },
  importExportBtn: {
    show: ".importExport",
    hide: ["#input", ".diaryEntries"],
  },
};

const mainInputs = Array.from(document.querySelectorAll(".mainInput"));
const colorBtns = Array.from(document.querySelectorAll(".color"));
const tabs = ["input", "diaryEntries", "importExport"];

let themeColor = checkLocalStore("themeColor");
let activeSelector = checkLocalStore("activeSelector", "");

mainInputs.forEach((i) => i.addEventListener("click", () => activateTab(i)));
colorBtns.forEach((i) => i.addEventListener("click", () => changeColor(i)));

styleBody(themeColor);
styleMainButtons(themeColor);
styleActiveBtn(themeColor);
showCurrentTabElements(activeSelector);

function styleMainButtons(color) {
  mainInputs.forEach((i) => {
    i.style.background = colorsConfig[color].btnBackground;
    i.style.border = `2px solid ${colorsConfig[color].activeBtn}`;
  });
  const importExportBtns = Array.from(document.querySelectorAll(".import"));
  importExportBtns.forEach((i) => {
    i.style.background = colorsConfig[color].btnBackground;
    i.style.border = `2px solid ${colorsConfig[color].activeBtn}`;
  });
}

function styleActiveBtn(color) {
  if (activeSelector) {
    const btnToStyle = document.querySelector(`#${activeSelector}`);
    btnToStyle.style.background = colorsConfig[color].activeBtn;
    btnToStyle.style.border = `2 px solid ${colorsConfig[themeColor].activeBtn}`;
  }
}

function showCurrentTabElements(activeSelector) {
  if (activeSelector) {
    const toShow = document.querySelector(
      `${showHideConfig[activeSelector].show}`
    );
    toShow.style.display = "block";
  }
}

function hideObsoleteTabElements(tab) {
  const toHideArr = showHideConfig[tab].hide;
  toHideArr.forEach((i) => {
    const el = document.querySelector(i);
    el.style.display = "none";
  });
}

function styleBody(themeColor) {
  document.querySelector("body").style.background =
    colorsConfig[themeColor].bgBackground;
}

function checkLocalStore(key, defaultVal = "blue") {
  const isValStored = localStorage.getItem(key);
  if (isValStored) {
    return JSON.parse(isValStored);
  } else {
    return defaultVal;
  }
}

function activateTab(tab) {
  styleMainButtons(themeColor);
  tab.style.background = colorsConfig[themeColor].activeBtn;
  activeSelector = tab.id;
  localStorage.setItem("activeSelector", JSON.stringify(activeSelector));
  showCurrentTabElements(tab.id);
  hideObsoleteTabElements(tab.id);
}

function changeColor(color) {
  themeColor = color.id;
  localStorage.setItem("themeColor", JSON.stringify(themeColor));
  styleMainButtons(themeColor);
  styleBody(color.id);
  styleActiveBtn(themeColor);
}

const showAlert = (msg) => {
  const alert = document.querySelector(".alert");
  alert.style.display = "block";
  alert.className = "alert uiText";
  alert.innerHTML = msg;

  setTimeout(() => {
    alert.innerHTML = "";
    alert.style.display = "none";
  }, 2000);
};

*Note that beside implementing Local Storage, I have also outsourced all the logic in simpler methods that I just reuse. This keeps our code clean and maintainable. Now the UI part is done. Try swapping tabs or colors and refreshing the page.

Let's move on to the notes.js file. For starters, we want a method that grabs the user input while on the Input tab, and that saves it. Add it as per below in the notes.js file:

const saveBtn = document.querySelector(".add-note");
saveBtn.addEventListener("click", grabNote);

const notes = [];

/*
 * Grabs user note and saves to localStorage API
 */
function grabNote(e) {
  const note = {};
  //regexp to 'know' how to put linebreaks
  let noteText = document.querySelector("#note").value;
  note.text = noteText.replace(/\r?\n/g, "<br />");
  const noteDate = new Date()
    .toString()
    .replace(/\S+\s(\S+)\s(\d+)\s(\d+)\s.*/, "$2-$1-$3");
  note.date = noteDate;
  let id =
    Math.random().toString(12).substring(2, 17) +
    Math.random().toString(12).substring(2, 17);
  note.id = id;
  notes.unshift(note);
  localStorage.setItem("notes", JSON.stringify(notes));
  document.querySelector("#note").value = "";

  //alert functionality
  showAlert("Note Saved 😉");
}

All is good, and if you check the Application tab in your dev tools you will see the notes stored, but we want to display them too. Replace all the contetns in notes.js with the below:

const saveBtn = document.querySelector(".add-note");
saveBtn.addEventListener("click", grabNote);

let notes;

if (localStorage.getItem("notes") === null) {
  notes = [];
} else {
  notes = JSON.parse(localStorage.getItem("notes"));
}

//call display notes to see the notes
displayNotes();

/*
 * Grabs user note and saves to localStorage API
 */
function grabNote(e) {
  const note = {};
  //regexp to 'know' how to put linebreaks
  let noteText = document.querySelector("#note").value;
  note.text = noteText.replace(/\r?\n/g, "<br />");
  const noteDate = new Date()
    .toString()
    .replace(/\S+\s(\S+)\s(\d+)\s(\d+)\s.*/, "$2-$1-$3");
  note.date = noteDate;
  let id =
    Math.random().toString(12).substring(2, 17) +
    Math.random().toString(12).substring(2, 17);
  note.id = id;
  notes.unshift(note);
  localStorage.setItem("notes", JSON.stringify(notes));
  document.querySelector("#note").value = "";

  displayNotes();

  //alert functionality
  showAlert("Note Saved 😉");
}

/*
 * Grabs notes from localStorage
 * API and displays them to UI
 */
function displayNotes() {
  let records = document.querySelector("#records");
  let output = "";

  notes.map((n) => {
    output += `
        <div class="card">
            <p class="text">
                ${n.text}
            </p>
            <p class="text">
                Written at: ${n.date}
            </p>
            <p class="text invisible">
                id: ${n.id}
            </p>
            <i
              onclick="editNote(event)" 
              class="fa fa-pencil pencil-note" 
              aria-hidden="true"></i>
            <span id="saveEdit">
              </span>
                <i 
                  onclick="deleteNote(event)"
                  class="fa fa-times-circle" 
                  aria-hidden="true"></i>
            <hr>
        </div>
      `;
  });

  records.innerHTML = output;
}

Now you can add a new note, it will get instantly displayed and on top of the file. Let's quickly add a filtering functionality, we want to filter by date and text:

//this will simply clear the filter upon click
const filterField = document.querySelector(".filter");
filterField.addEventListener("click", () => (filterField.value = ""));

/*
 * Filters notes by title/date
 */
const filter = () => {
  document.querySelectorAll(".card").forEach((item) => {
    let value = document.querySelector(".filter").value.toLowerCase();

    const note = item.children[0].innerText;
    const date = item.children[1].innerText;

    if (
      note.toLowerCase().indexOf(value) != -1 ||
      date.toLowerCase().indexOf(value) != -1
    ) {
      item.style.display = "block";
    } else {
      item.style.display = "none";
    }
  });
};

*Note that we did not hook any event listener for the actual filter() method, the reason for that is that in the index.html file we have an oninput="filter()" event added directly into the template.

Now that we can filter, let's edit the notes too. Add the below 2 methods in your notes.js file:

/*
 * saves note after edit
 */
const saveNote = (e) => {
  let newText = e.target.parentElement.parentElement.childNodes[1].innerText
    .trim()
    .replace(/\r?\n/g, "<br />");
  let newDate = new Date()
    .toString()
    .replace(/\S+\s(\S+)\s(\d+)\s(\d+)\s.*/, "$2-$1-$3");
  let idToEdit = e.target.parentElement.parentElement.childNodes[5].innerText
    .trim()
    .split(":")[1]
    .trim();

  let newResource = {
    text: newText,
    date: newDate,
    id: idToEdit,
  };

  notes.map((n, index) => {
    if (n.id === idToEdit) {
      notes[index] = newResource;
    }
  });
  localStorage.setItem("notes", JSON.stringify(notes));
  let cardToEdit = e.target.parentElement.parentElement.childNodes[1];
  cardToEdit.contentEditable = false;
  cardToEdit.style.backgroundColor = "#f0edd9";
  cardToEdit.style.padding = "0";
  const editIcon = e.target.parentElement.parentElement.childNodes[9];
  editIcon.style.display = "none";
};

/*
 * Allows note editing
 */
const editNote = (e) => {
  if (e.target.parentElement.childNodes[5].innerText !== undefined) {
    idToEdit = e.target.parentElement.childNodes[5].innerText
      .trim()
      .split(":")[1]
      .trim();
  }

  let cardToEdit = e.target.parentElement.childNodes[1];
  cardToEdit.contentEditable = true;
  cardToEdit.style.backgroundColor = "#fff";
  cardToEdit.style.padding = "1.5rem";
  const editIcon = e.target.parentElement.childNodes[9];
  editIcon.style.display = "inline-block";
  editIcon.innerHTML = `
  <i 
    onclick="saveNote(event)"
    class="fa fa-check" 
    aria-hidden="true">
  </i>`;
  e.preventDefault();
};

Now you can edit and save the notes too. Let's add the delete functionality before moving on to the final task of adding import and export:

/*
 * Deletes a note
 */
const deleteNote = (e) => {
  let idToDelete = e.target.parentElement.childNodes[5].innerText
    .split(":")[1]
    .trim();
  notes.map((n, index) => {
    if (n.id === idToDelete) {
      notes.splice(index, 1);
    }
  });
  localStorage.setItem("notes", JSON.stringify(notes));
  e.target.parentElement.style.display = "none";
};

*Note that for both the edit/save methods and for delete we did not actually 'manually' bind event handlers to icons (instead we did it directly in the template) inside the displayNotes() method. This makes it much easier to handle the event binding for notes that are being dynamically added/removed by the user. One more thing I want us to do before moving to import/export is to add a deleteNotes() method too (for clearing everything):

const deleteAllBtn = document.querySelector("#deleteNotes");
deleteAllBtn.addEventListener("click", deleteNotes);

/*
 * Delete all notes
 */
function deleteNotes() {
  deleteAllBtn.style.backgroundColor = "red";
  deleteAllBtn.style.border = "2px solid black";
  notes = [];
  localStorage.removeItem("notes");
  document.querySelector("#records").innerHTML = "";
  showAlert("Notes deleted Successfully 😉");
}

Now you can test the delete functionality (both with one note and with all of them). Finally I want us to do the import/export part. Let's do the export first:

const exportBTN = document.querySelector("#exportBtn");
exportBTN.addEventListener("click", exportNotes);

/*
 * Export  notes as JSON
 */

function exportNotes() {
  let notesObj = {
    notes,
  };
  let exportDate = new Date()
    .toString()
    .replace(/\S+\s(\S+)\s(\d+)\s(\d+)\s.*/, "$2-$1-$3");
  var a = document.createElement("a");
  document.body.appendChild(a);
  a.style = "display: none";
  var json = JSON.stringify(notesObj),
    blob = new Blob([json], { type: "octet/stream" }),
    url = window.URL.createObjectURL(blob);
  a.href = url;
  a.download = `myNotes-${exportDate}.json`;
  a.click();
  window.URL.revokeObjectURL(url);
}

Go to the export tab, and you can test 'exporting' your notes (after having added at least one of them of course). After having exported the notes, add the import method too, and test the importing of the very same .JSON file:

const importBTN = document.querySelector("#importBtn");
importBTN.addEventListener("click", importNotes);

/*
 * Import JSON with  notes
 */
function importNotes(e) {
  document.getElementById("file").addEventListener(
    "change",
    (evt) => {
      var files = evt.target.files;
      var file = files[0];
      var reader = new FileReader();
      reader.onload = function (event) {
        let newNotes = JSON.parse(event.target.result).notes;
        newNotes.map((i) => notes.unshift(i));
        localStorage.setItem("notes", JSON.stringify(notes));

        showAlert("Notes imported Successfully 😉");
        displayNotes();
      };
      let readValue = reader.readAsText(file);
      console.log(readValue);
    },
    false
  );
}

If you have been following me until now, Here is a cleaned up version of notes.js. And also the full Repo.

Now our application is complete. It works just as the initial version you have been testing at the beginning of this article. We have even refactored it and decoupled some functionality. The next projects we will build will have a real back-end, and not only use files written in localStorage. I do hope you have enjoyed working on this little project and I thank you a lot for sticking with me until the very end.